This article is part of a new series called Clarinet in the Time of COVID that aims to help clarinetists find the most recent and important information regarding the evolution of our field as a result of the COVID-19 global pandemic. If you have information that you would like to share as a part of this series please contact Jenny Maclay at [email protected].

Tips on physical and internet set-up for online clarinet lessons
by Peter Stoll
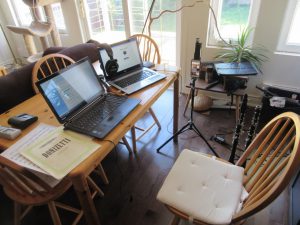
With the onset of the COVID-19 shutdown in mid-March, I, like many other teachers, found myself having to quickly learn how to move clarinet lessons online. This was an intense process in a compressed time-line, and I’d like to share some of what I figured out, in terms of the physical and internet set-up for teaching this way. I use Skype and Zoom as my online video connection platforms, with specific settings for each to maximize the audio quality, but that falls outside the scope of this article.
To the basics of internet connectivity first: if you and your student don’t have a good steady connection to the internet, you can expect frequent issues with the signal freezing, and the connection itself dropping (meaning that you will have to re-establish the call). Consider these options for improving your connection:
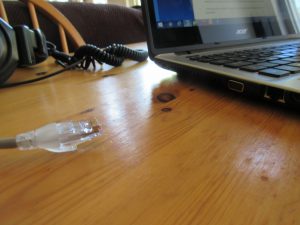
*plugging your device directly into your modem, via an “ethernet cable” (this looks like a standard telephone cable, with a slightly-bigger jack
*if using wifi, locating your device closer to your modem will often substantially improve the speed of your signal
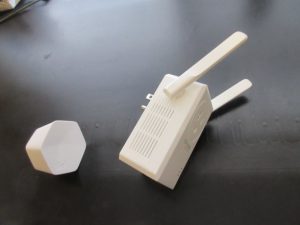
*if you must be situated at a distance from your modem, consider a ‘wi-fi extender’ unit or pods/pucks. These may be a low-cost purchase or a cheap monthly rental from your internet service provider.
*remember that both sides of the connection must be solid for it to be stable. You can have super-fast internet, but if your student has a shaky connection, trouble will likely follow. One trick that worked for one of my students, set up in her basement, was to use her mobile phone as a personal wi-fi hotspot (accessed through the main settings menu on an iPhone for example) to bolster the main wifi signal.
As they say in real estate, “location, location, location”! In addition to proximity to your modem, you want a place to teach that is visually inviting if possible, so a larger, well-lit space rather than a small dim one. This may also help the acoustic, but a carpeted large room with a higher ceiling may help avoid any boomy echo.
You’ll want to control the lighting: enough to create a bright and clear image, but not too much, to avoid eyestrain for you. Light coming from behind either person can create glare for the other. You may want to plan a physical space rehearsal with a new student before a lesson, or allow some extra time at the start of the first session, to make sure things are working, and set up optimally. Don’t be afraid to ask a student to change their location if there’s a lot of back-light, the sound is hard to hear, or the internet connection keeps dropping.
Of course you want to have a space that will be free from interruption from family members, room-mates, children, pets etc. If you share your space, negotiation is imperative, and there may be bandwidth issues with shared internet too. Especially if everyone is still under lock-down or working from home, careful planning about where and when you can teach, will expedite things when students ask when they can schedule weekly lessons.
Think about what students will see in your background: it should look neutral and professional. Some teachers with young learners have a series of cute plush animals or music-themed objects that they rotate, to avoid the background looking the same all the time.
It will be helpful to have a large desk or table to work on, as you may want to use multiple devices, or have sheet music ready to consult. In the case of a tighter space, you could place printed material on a music stand next to your work surface.
Unlike in-person lessons where the student usually brings in their music and you both share it on your stand, it is essential to have copies of the studies, excerpts and solo repertoire your student will be playing. You’ll want to get these ready in advance of the lesson. Sheet music might best go behind your device until you need it, to conserve space. If you have scanned copies of music on a device, you will want to get them open and ready to access before the lesson.
As you will want as large an image of your students as possible, I would recommend a laptop or desktop computer or tablet, vs. a smart phone. As always, it’s important to be able to see their playing posture and position, embouchure, finger height etc.
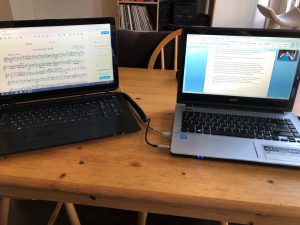
If you have a second laptop or a tablet, this can be helpful to display copies of a student’s music during their lesson, or to type lesson notes into a Word document. Having two larger screens really helps to avoid confusing toggling of pages and views!
A note about metronomes and tuners: the student must have their own metronome to use during the lesson, if you want to hear them playing with it.
I would highly recommend this; with the issue of internet ‘lag’ (where the data stream pauses or changes speed for a moment, before settling down again) you will often hear bizarre rubato. But when the student’s metronome also speeds up and slows down in sync with their playing, you can be sure it isn’t their sense of pulse that’s at fault!
One student tried using a headset with microphone, and couldn’t hear his own metronome. We tried him listening to mine, but due to the internet ‘lag’ issue, he sounded to me to be playing exactly between the beats I heard! I recommend a combined metronome/tuner app like “Tunable” to students. If I need to check their tuning, I have found that if I unplug my headset and turn up the laptop speaker volume, I can get a reading of their pitch on my tuner.
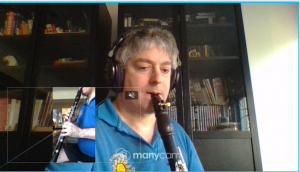
One last idea: it can be very helpful to provide a smaller second view within your main camera window. So for large instruments, you can have one camera on each hand, or 1 on face/embouchure, 1 on fingers, etc. This is a way of overcoming the limited field of view online teaching can impose.
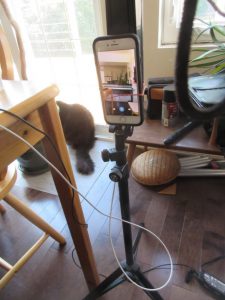
I use a folding music stand put together but with the top part that would hold the music still folded. A simple setup of an elastic band and the bottom of the folded stand table works to brace the phone. This keeps it to where I can hold the clarinet up close to this second camera, and demonstrate fingering. For bass clarinet or other large horns, this can be a great way to properly cover finger position as well as embouchure at the same time.
Zoom will allow adding a second camera, but Skype doesn’t. But there is a free work-around that functions with both platforms; a third-party app like “ManyCam”, the one I’ve found the most success with
I hope these general and specific suggestions will be of help, as more of us explore this ‘whole new world’ of clarinet teaching!
Comments are closed.