Originally published in The Clarinet 47/1 (December 2019). Printed copies of The Clarinet are available for ICA members. 
Teaching Clarinet
by Michael Webster
Reed Redemption Part 3
This column began in 1998 by addressing issues related to teaching beginners, gradually moved to intermediate students, and now has reached the intermediate/advanced stage. After writing “Reed Redemption” Parts 1 and 2, I was asked to add another episode about reed making, which is an advanced topic. Here it is.
Not everyone takes to making homemade reeds. There are a few reasons why I did. First, I always liked working with my hands. As a kid, one of my favorite pastimes was whittling and making models. I was also very nearsighted. Without wearing my glasses, holding reeds a couple of inches away gave me a great detailed view of the fibers, better than someone with better distance vision. By contrast, my mentor, Stanley Hasty, was able to stroke the vamp of a reed and find low and high spots by touch. He allowed me to find my own way while offering constructive comments and criticism reed by reed.
This article can’t substitute for that kind of hands-on guidance, but it may encourage you to give reed making a try, preferably with the advice of an experienced reed maker. This article will refer to “Reed Redemption” Part 1 (Vol. 46, No. 1, Dec. 2018) and Part 2 (Vol. 46, No. 3, June 2019), so have them handy if possible.
Hasty’s only tools were knives, sandpaper and plaques. As a result, I didn’t seek out a reed-making machine for several years. I am convinced, however, that my many hand-whittled failures served me well in learning how to balance vamps properly. When I finally got my first and only reed machine, the Reedual, it shaved about a half-hour off the process of making each reed. That was more than 50 years ago! For a detailed explanation of how to use Reedual, see the longer electronic version of this article at The Clarinet Online (www.clarinet.org/tco).
The photo below shows my 50-year-old Reedual with my 40-year-old model reed.
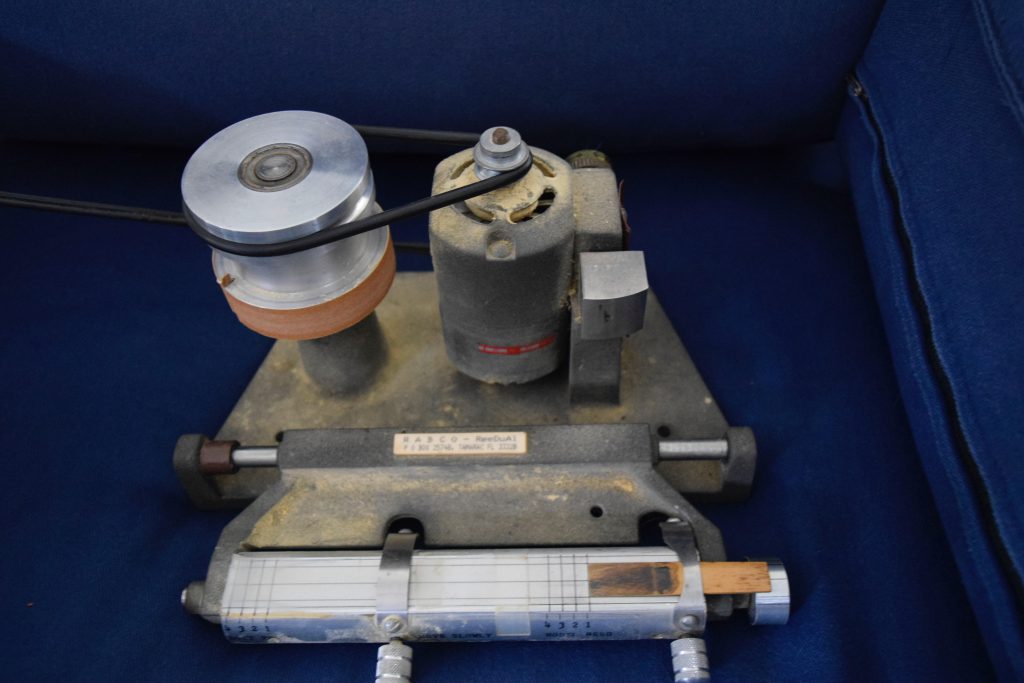
Reedual Photo
For a look at a recent Reedual, complete with demonstration by Amy McCann, go to https://precisionreedproducts.com/gallery.
Her method has differences from mine, which gives you a choice. Ultimately we all find a personal way, whether dealing with commercial reeds or making our own.
The Reedual has improved since I bought mine, and other competitive machines have entered the market. For an overview of available machines, go to http://clarinetreedmaking.com and click on the overview of profiling machines. I haven’t tried any of them personally, but I encourage all clarinetists to seek out the machine that suits them best. All are a vast improvement over the whittling approach! Most of my recommendations for the Reedual will apply to other machines as well.
Characteristics of Reed Blanks
1) The bark is very hard; then the cane gets gradually softer toward the center of the tube (and the bottom of the blank).
2) The sides of the blank are not exactly parallel. The extra width toward the tip end causes it to appear thinner even when it isn’t.
3) Evenly thick left and right rails indicate that the tube was close to being perfectly cylindrical. Therefore it is a little easier to achieve equal balance across the finished tip.
4) The texture of thick blanks tends to be softer than the texture of thin blanks.
5) A thicker blank requires a longer vamp; a thinner blank requires a shorter vamp.
6) The color of the bark does not matter.
7) The color of the pulpy material should be yellow. Tinges of white or brown are usually fine; green is not.
Advantages of Making Reeds
1) The Most Important: It is easier to prepare the bottom of a reed blank than the bottom of a finished reed. Reed makers and adjusters all agree that the reed must seal the mouthpiece well in order to function properly. Flattening and polishing the reed bottom improves the seal. I use #400 sandpaper for flattening and #600 sandpaper for polishing. For details, see Reed Redemption, Part 2.
2) Properly made homemade reeds are more stable than commercial reeds. The intense polishing of both sides of the reed compresses the fibers (xylem), thus discouraging moisture from seeping in. Homemade reeds are more impervious to changes of climate than commercial reeds and less likely suddenly to close up, or “go soft.”
3) As a result, homemade reeds last longer than commercial reeds. Time spent in making reeds is rewarded by requiring fewer reeds. I’ve also noticed that after a homemade reed has finally completed its useful life, it can often be revived for a few more hours of practicing (not performing) after sitting for a period of weeks or months.
4) Inspecting the blank before cutting it gives a distinct view of its shape, the tube not always being perfectly cylindrical. For example, one can see whether the thickness of the rails remains constant from shoulders to tip. This allows the reed-maker either to reject an unsatisfactory blank or to take its inconsistencies into account when making the reed. The most typical configuration is for the bark of the blank to swoop down on one side of what will become the tip, making that corner of the blank thinner than the other. The thinner corner will be closer to the bark, therefore harder in texture. Knowing this helps the final balancing.
5) I have never been able to judge the quality of cane reliably until actually play-testing it. Hypothetically, choosing one’s own blanks should improve quality, and to some extent that may be true. For example, one batch of blanks from a given source may turn out to be consistently good or bad. The best way to be sure that all of your reed-making attempts use good cane is to start from tubes, make one reed from a given tube, then use or discard the rest of the tube based on the quality of that reed. Over the years, however, I’ve gotten away from starting with tubes because of the extra time expended.
6) Because homemade reeds last so well and a much larger percentage of them are usable, time is saved. Of course, there are many very fine clarinetists who do little, or even no adjusting of commercial reeds. Ultimately, we all make our own decisions about time spent relative to results achieved.
7) Even including the investment in a good reed machine, making reeds is much cheaper than buying commercial reeds. Excellent results are most important, but saving money is always welcome.
Reed Making Principles in General
1) The back of the reed should be flattened for consistency and polished to improve its lifespan.
2) The relative thickness of every area of the vamp matters. The contour must include the right and left halves being mirror images of each other and every point from tip to shoulder balanced in accordance with the individual’s mouthpiece and embouchure to achieve optimal tone quality and response in all registers at all dynamics.
3) In general, a thin tip and strong resistance under the lip favor the upper register; a thicker tip and less resistance under the lip favor the lower register. Similarly, less swoop from shoulder to tip creates a darker or huskier tone quality; more swoop creates a brighter or reedier tone quality.
4) Good quality cane with excellent elasticity is more important than perfect shape. Judging the quality of cane is difficult, however, until the reed is thin enough to flex with your finger and make a tone. How it plays is the ultimate test.
5) The best way to judge reed strength is through the flex test, and to some extent the X-ray test (as described in “Reed Redemption” Part 2), not through precise measurement.
6) It is safer to start with the vamp a bit shorter than the goal measurement (which corresponds to the length of the mouthpiece window for blanks of average thickness). Work on the tip first; get it to be close to the resistance you want, then lengthen the vamp. If the reed is slightly too strong, place it lower on the mouthpiece, then gradually move it higher as it breaks in. If the vamp starts out being too long or too swooped, the reed must be completely remade – not impossible, but difficult and time consuming.
Steps in Using a Reedual:
1) Leave the belt off when not in use.
2) Have a reliable model. I have used the same model for at least 40 years. I made it by hand and it has a really good shape with a contour that has worked well for my embouchure and mouthpieces. Example 1 shows how the tip is still flat (not rounded or clipped) and the vamp has become black with thousands of passes across the guide. Not every excellent reed makes a good model because some do not have completely symmetrical dimensions. Experiment until you find the model of your dreams. If you change mouthpieces, you may need to change the model reed.
3) The plastic strip under the new blank protects the Reedual table from the sandpaper. Don’t remove it; do replace it when necessary.
4) Start with a flat, polished blank. See “Reed Redemption,” Part 2.
5) Wear eye protection. The chances of a belt breaking are minuscule, but you have only one pair of eyes. When I was still nearsighted, I wore clear plastic goggles. Since having had lens replacement surgery a few years ago, I wear my progressive-lens glasses.
6) For B-flat or E-flat clarinet reeds, place both the model and the blank on line number 1, farthest to the right. Larger reeds are placed on lines 2-4 depending on their size. To prevent the tip from being too thin or having nicks, be absolutely certain that the blank is not too far to the left.
7) I read an opinion that the sandpaper strip on the Reedual should be changed for every reed, which would certainly lend consistency. I prefer, however, to peel the bark with a knife because the bark is hard and wears down sandpaper quickly. It can be annoying to change the sandpaper because the leather thong has to be pressed thoroughly into the slot. The tiniest bit of give in the sandpaper will prevent accurate duplication of the model’s shape. Once the sandpaper is in place, I use it for several reeds.
It is true that the sandpaper wears down a bit for each reed, which affects the adjustment of the guide from “softer” to “harder.” But that choice is also contingent upon the texture of each individual blank. Softer blanks will need to be thicker; harder blanks will need to be thinner. My advice is to start well toward the “harder” setting to be sure not to make the reed too weak. Once the material is gone, it is gone. It is much easier and more reliable to make a reed gradually weaker than to get it too weak and have to redo the whole vamp.
8) Hold the left side of the base with your left hand. This will prevent you from touching the sliding table, which would eliminate the exact duplication of the model. I have a personal idiosyncrasy:
I feel more in control by placing the Reedual on the floor and kneeling in front of it. I use a hand vac to clean the floor afterwards. Because I start by using a knife to peel off the bark into a wastebasket, there is not a large amount of sawdust.
9) Inspect the reed while it is still a tiny bit too thick. View the fibers from the front and with the X-ray technique. With experience, one can judge whether it still needs to be thinned, especially by noting how the fibers break off toward the tip. If a large proportion of them go all the way to the tip, the reed is still too thick and should be returned to the machine (without wetting the reed). Adjust the guide one or two notches “softer” and run the machine again.
Another test is to flex the tip very, very gently while it is still dry, giving you another clue about the resistance. Beware! It will not be nearly as flexible as when it is wet, so don’t overdo. One never knows whether it will be possible to return a reed to the machine after wetting it, because some tips will warp when wetted, whereas others won’t. I avoid returning a warped tip to the machine because the sandpaper will now strike the tip unevenly. Deciding when to test by playing is a matter of experience. With a lot of practice, it is possible to judge quite well when the reed has reached the right degree of resistance to vibrate well without being too weak.
10) Don’t worry about the thickness of the blank or the length of the vamp. Thinner blanks will come from the machine with shorter vamps; thicker blanks will have longer vamps. In general, the length of the vamp correlates well with the thickness of the blank. The adjustment most often necessary is to lengthen short vamps by using a knife at the shoulders. This is an easy and reliable procedure, far easier than compensating for a vamp that is too long. Use alternately parallel and 45 degree-angled scrapes to avoid nicks. If you make a nick, put the knife at an angle to the nick, or take it out with #320 sandpaper. Don’t keep digging the knife into the nick.
11) Some blanks are not perfectly symmetrical. Don’t worry about the shoulders being unequal; many such reeds will be just fine. If a reed needs livening up, then use a knife to scrape the shoulder that has the most bark. This will be the thinner shoulder, but actually the more resistant because of the hardness of the bark.
12) Occasionally, a reed will come from the machine needing no handwork; more often handwork will be necessary because of the unequal spacing of the fibers. See “Reed Redemption,” Part 2 for strategies.
13) Break in each reed slowly and carefully, as described in “Reed Redemption,” Part 1.
14) Inspect the fiber structure and balance each reed as described in “Reed Redemption,” Part 2.
Finishing Homemade Reeds
Regardless of which machine you have chosen for making reeds, the following tips are applicable:
1) Inspect the reed while it is still a tiny bit too thick. View the fibers from the front and with the X-ray technique. With experience, one can judge whether it still needs to be thinned, especially by noting how the fibers break off toward the tip. If a large proportion of them go all the way to the tip, the reed is still too thick and should be returned to the machine (without wetting the reed). Adjust your machine “softer” and run the machine again.
2) Another test is to flex the tip very, very gently while it is still dry, giving you another clue about the resistance. Beware! It will not be nearly as flexible as when it is wet, so don’t overdo. One never knows whether it will be possible to return a reed to the machine after wetting it, because some tips will warp when wetted, whereas others won’t. I avoid returning a warped tip to the machine because the sandpaper will now strike the tip unevenly. Deciding when to test by playing is a matter of experience. With a lot of practice, it is possible to judge quite well when the reed has reached the right degree of resistance to vibrate well without being too weak.
3) Don’t worry about the thickness of the blank or the length of the vamp. Thinner blanks will come from the machine with shorter vamps; thicker blanks will have longer vamps. In general, the length of the vamp correlates well with the thickness of the blank. The adjustment most often necessary is to lengthen short vamps by using a knife at the shoulders. This is an easy and reliable procedure, far easier than compensating for a vamp that is too long. Use alternately parallel and 45-degree-angled scrapes to avoid nicks. If you make a nick, put the knife at an angle to the nick, or take it out with #320 sandpaper. Don’t keep digging the knife into the nick.
4) Some blanks are not perfectly symmetrical. Don’t worry about the shoulders being unequal; many such reeds will be just fine. If a reed needs livening up, then use a knife to scrape the shoulder that has the most bark. This will be the thinner shoulder, but actually the more resistant because of the hardness of the bark.
5) Occasionally, a reed will come from the machine needing no handwork; more often handwork will be necessary because of the unequal spacing of the fibers. See “Reed Redemption,” Part 2 for strategies.
6) Break in each reed slowly and carefully, as described in “Reed Redemption,” Part 1.
7) Inspect the fiber structure and balance each reed as described in “Reed Redemption,” Part 2.
As the summer approached, I made eight reeds. I give each reed a serial number so that I can track their progress. Simplified, these reeds are A, B, C, D, E, F and G. One was a bad piece of cane that never got a serial number. I discarded it because it had no vibrancy and the tip didn’t spring back when flexed.
My first assessments were:
- A) Too good off the Reedual, then weak.
- B) Strong off the Reedual, thinned by hand, mostly center plus full vamp. Performed Menotti Trio at Texas Music Festival in June with tip unfinished.
- C) Unbalanced off the Reedual – right corner weak. Scraped L corner but not to balance completely = good sound and response – poco chirp?
Photo 1 shows the X-ray test of A, B and C. The even spacing of the fibers in B contributes strongly to its quality, but I had to do a lot of knife work to get it to this state. Although the center of the tip is a little bit ragged, I chose not to finish it because it was playing so well. Reed A was a little weak coming off of the Reedual and never had enough resistance. The right corner of C was too weak. I’m not sure why. Perhaps the blank was not as flat as I thought or I positioned it crookedly or too far to the right on the Reedual table. Despite that flaw, it plays well but does threaten to chirp occasionally.
Use new #600 sandpaper to round the tip, drawing it toward the center from each corner. Frequently I do this procedure in several steps and occasionally will stop before it is completely finished if the reed is playing extremely well (as with B). I could have finished the tip of C, but decided to leave it with the irregularity that you see because it sounded and felt so good. The slight danger of chirping relegated it to the practice studio, where it will give many pleasant hours of service.
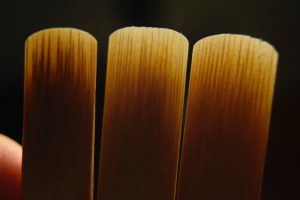
Photo 1
- D) Thin blank = short, very strong. Scraped center tip – R corner warping up makes knife work hard. Used a lot of sandpaper. Lengthening frees it up a lot but still strong. Next stage: still strong after lots of scraping. Not vibrant. Added tip because of lots of inconsistency of fibers.
- E) Strong, a bit unbalanced – weak right tip. Scraped left center – have to avoid extreme left. Next stage: Responded well to balancing. Scraped left center quite a bit, avoided left corner.
- F) Poor response – balancing tip – weak L corner, very strong L center (E and F very similar profile).
- G) Excellent.
Photos 2, 3 and 4 show the process of balancing reed F. The flex test shows the extreme left corner to be weak and the left center to be strong. Example 5 shows how the knife is positioned to scrape the left center while avoiding the left corner. Always hold the blade of the knife under the supporting thumb so that it draws along the slanted surface of the reed, not parallel to the plaque. The actual scraping was done ahead of where the knife appears in the photo, scraping all the way to the tip with a bit more exposed plaque area than the photo shows.
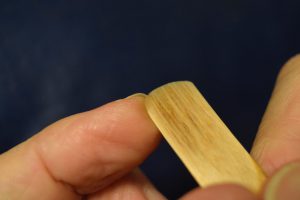
Photo 2
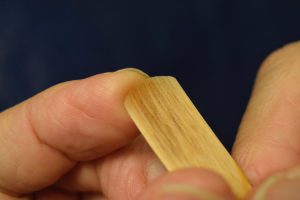
Photo 3
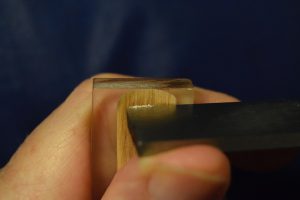
Photo 4
Photo 5 shows F and G from above.
Photo 6 shows the X-ray view. Both of them became very good reeds. F required handwork; G didn’t. In a way G is the ideal reed, coming off the machine and playing well with no handwork required. This does happen occasionally, and this group of eight reeds is fairly representative of what you may expect.
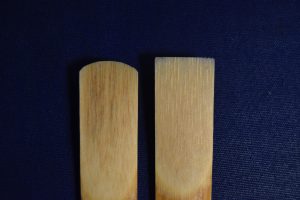
Photo 5

Photo 6
Summer is over. Here’s how they ended the summer:
- A) Didn’t develop well during break-in
- B) Aged well; I never completely rounded the tip; Used it for ClarinetFest® in July. It is somewhat ironic that this reed resisted me and required a lot of handwork but ended up being one of the two best. I used it to try clarinets and mouthpieces at the exhibits and now it deserves a hero’s funeral.
- C) Plays well despite the weak right tip, but still has a little tendency to chirp. I wouldn’t perform on it, but it feels good and will give me many hours of practice time. I could try to balance it and finish the tip, but experience tells me that the chances of success are poor. Don’t try to make every reed perfect!
- D) Feeling stubborn, I worked on D quite a lot but it never came around. I’ll probably ditch it.
- E) Good response, slightly husky sound. I haven’t played it much and expect it to continue to improve.
- F) Very good sound and response. The unusual brown color of the cane is not a detriment.
- G) Still excellent. No hand work at all. Best of the bunch now that B is over the hill. Tip is ¾ rounded, but it plays so well that I won’t finish rounding it unless it closes up a lot more.
Photo 7 shows G as it looks now. The unfinished tip allows latitude in placing it on the mouthpiece. As it ages, it is likely to go higher on the mouthpiece, perhaps to a point where the tip will need to be finished rather than overlapping too much. (If the reed needed livening up, I would scrape the bark away from the shoulders. But it doesn’t!)
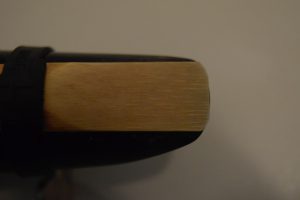
Photo 7
Final assessment:
A: made a miraculous comeback and became quite happy sitting high on the mouthpiece, so my assessment rose from disappointing to good.
B, G and F: excellent performance quality reeds.
C and E: Unlikely to be performance quality, but very serviceable
D: disappointing
Once a reed receives a serial number, it doesn’t change. That number will identify the reed for its lifetime. Of course, one wants a pecking order of good reeds, but I don’t recommend having it be reed #1, #2, #3, etc. The pecking order will change as the reeds break in. My batch is a dramatic example in which A was far better than B at the start, but faded. B, however, became a favorite, only after a lot of handwork. Why? B turned out to be a better piece of cane.
For more detail, I reiterate my recommendation from “Reed Redemption,” Part 2: Randall Stewart Paul’s A Study and Comparison of Four Prominent Reed Making Methods, D.M.A. dissertation from University of Oklahoma, published by UMI Dissertation service. Further study will improve your ability to redeem reeds!
Webster’s Web
Your feedback and input to these articles are valuable to our readership. Please send comments and questions to:
Michael Webster
Shepherd School of Music, MS-532
P.O. Box 1892
Houston, TX 77251-1891
Ian Seddon from London, Ontario writes:
Thank you, Michael, for two great articles about caring for one’s clarinet reeds. A couple of thoughts came to mind from reading your articles.
First are tips I have learned from oboists, who, as you know, deal with reeds much more expensive than those clarinetists use. Oboists prefer to moisten their reeds with water before playing them – and many seem to carry with their gear small bottles of water for just that purpose. Second, they rinse their reeds with water after playing on them and then gently dry off the excess water before storing them for future use. To me this seems like a good idea since plain water does not contain any acidity or alkalinity – or combination thereof – which it seems saliva may contain. Hence, there is less chance of unwanted “chemistry” happening on the reed surfaces. Since I have been doing this (for more than a couple of years now), I am of the opinion the “lives” of my reeds have been extended. I apply this to both my clarinet reeds and my tenor saxophone reeds.
Your discussion about balancing reeds is spot on – but a far easier way of doing this is with the “ReedGeek!” Information on this very valuable reed tool can be found at www.reedgeek.com. It works equally well with both clarinet reeds and tenor saxophone reeds, and therefore, I would assume, will work equally well for alto and bass clarinet reeds. This tool makes the balancing process, when required, much easier and much less fussy. It also simplifies mitigating warpage problems.
About breaking in reeds, I commend for your consideration “How to Successfully Break in Clarinet Reeds” by Amanda Lanser:
https://musicinstruments.knoji.com/how-to-successfully-break-in-clarinet-reeds/.
I have been using her approach for over 5 years now and found it to be simple and effective! However, I do add to her approach your advice about “sealing the xylem” with the exception that I have been using a sheet of white, heavier (24 lb) laser printer paper instead of fine sand paper.
My comments: I bought a ReedGeek but haven’t had a chance to give it a trial. Perhaps I’ll be able to include impressions in the next Webster’s Web. Amanda Lanser’s article overlaps with my approach – similar but not identical. I encourage readers to seek out many different sources and methods. Regarding terminology, Amanda calls the bottom of the reed “the rail.” I call the sides of the cut portion of the reed “the rails.” Sometimes I may recommend scraping “along the rails,” which means along the extreme right and left sides of the vamp. See “Reed Redemption” Part 1 for a diagram of terminology.
About the Writer

Michael Webster is professor of music at Rice University’s Shepherd School and artistic director of the award-winning Houston Youth Symphony. Formerly principal clarinet of the Rochester Philharmonic and acting principal clarinet of the San Francisco Symphony, he has served on the clarinet faculties of Eastman, Boston University, and the New England Conservatory. A winner of Young Concert Artists, he has soloed with the Philadelphia Orchestra and the Boston Pops and appeared with the Lincoln Center Chamber Music Society, the Tokyo, Cleveland, Muir, Ying, Dover, Enso and Artaria Quartets, and many summer festivals.
Comments are closed.