
Originally published in The Clarinet 44/4 (September 2017). Printed copies of The Clarinet are available for ICA members.
This article was the 2016 ICA Research Competition Winner. Please see here for more information on the research competition.
by Ron Odrich
The longer you can look back, the farther you can look forward. – Sir Winston Churchill (1874-1965)
HISTORY
It all began with Leonardo da Vinci. In the early 16th century, he discovered that when the flow of a large fluid volume was compressed through a small opening under constant pressure, it demonstrated a rapid increase in velocity.1 He discovered this by introducing small granules of opaque material in water and observing the effect in a glass replication of an ox heart as the fluid passed under pressure through the valve separating the heart from the aorta. Significantly for future clarinetists, da Vinci also noted that the smaller the aperture was, the greater the velocity. In physics, the study of fluid dynamics includes the flow of gases as well as liquids.
Our concerns as clarinetists involve the mechanics of airflow dynamics. It is generally acknowledged in clarinet pedagogy that a column of air with a high velocity is indispensable in achieving an exquisite tone and legato. This correlation is a key point in understanding the role of science in the art of the clarinet legato.
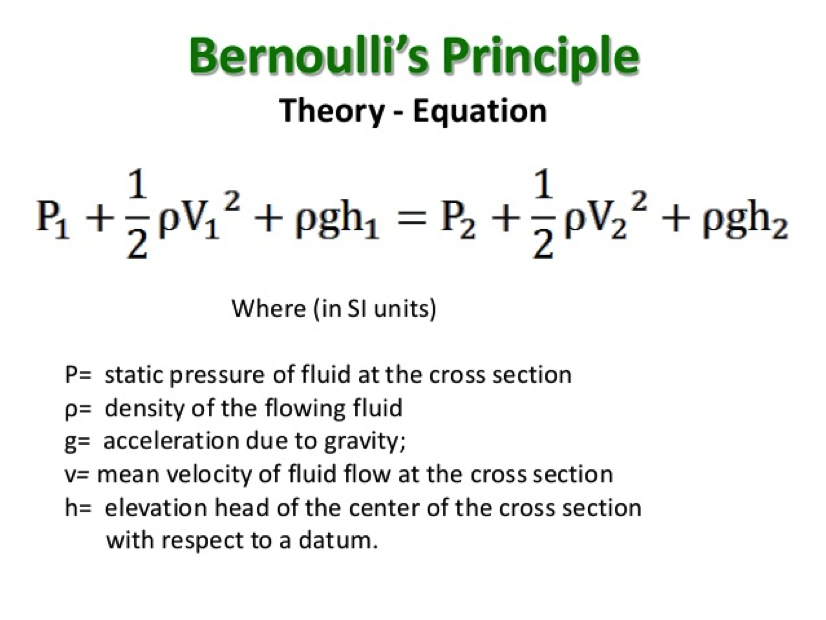
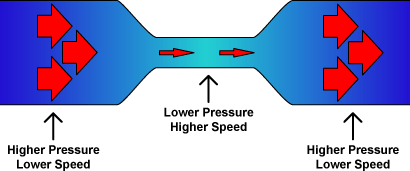
Figure 1: Bernouilli’s Principle
This formulation in turn was further refined by Giovanni Battista Venturi (1746-1822), an Italian physicist and priest. The “Venturi apparatus” clearly demonstrated a reciprocal reduction in pressure within the column of air as it passed from a larger volume through a smaller aperture at an increased velocity (see Figure 2).4 (It is also interesting to note that the Hans Moennig barrel applies the “da Vinci principle” – just before the airflow enters the upper joint it passes through a reverse tapered bore… a Venturi tube.) The principles established by these historic developments form the basis for creating an effective clarinet legato.

Figure 2: As the column of air passes through a constriction, its velocity increases and its pressure
decreases proportionally
IMPLICATIONS FOR CLARINET PLAYING
There are three requirements for applying these principles to playing the clarinet:
- The creation of an expanded volume of air to act as a primary source, which will be shaped into a directed air column
- A method for shaping the flow of the air column as it is directed to the tip of the reed: the “velocity point”
- The formation of a small aperture at the velocity point, which will achieve the optimum velocity of the column of air as it activates the reed
1. Establishing a Large Volume of Air
As reported by Luis Rossi in The Clarinet, Anton Stadler in 1800 recommended the “open throat” vocal technique to produce a beautiful clarinet tone.5 In his day, Stadler was celebrated for the beautiful, voice-like quality of his sound. To apply this method it is necessary to enlarge the space in the oropharynx (the space in the throat directly behind the tongue) as a way of getting a more vocal sound on the clarinet (see Figures 3 and 4). Raising the soft palate achieves this and has many other functions useful in clarinet playing.6

Figure 3: Normal oropharynx space resulting in slower air stream

Figure 4: Enlarged oropharynx space
It has been noted that curling the upper lip against the facial aspects of the upper front teeth and gently pulling back raises the soft palate in the back of the mouth.7 This action automatically creates the desired larger space in the oropharynx, which was referred to by Stadler as the “open throat.” The larger space will house a larger volume of air as a primary source. Commonly such an action triggers a yawn, which results from significantly raising the soft palate.8 Clarinetists who use a double-lip embouchure automatically create this space, but it also is easily achieved using a single-lip embouchure by curling the upper lip under and drawing it back over the facial surfaces of the upper front teeth as described.
2. Shaping the Air Column
The tongue position is critical in shaping the air column. To achieve this goal, very gently retracting the lower jaw into what is called the “retruded position” reduces the space for the tongue, causing it to arch and spread laterally. This tongue position serves both to shape the air column and act as the floor of a valve that delivers the air column to the reed tip. In this way the tongue can precisely sculpt the size and shape of the column of air and control the size of the aperture at its tip, making it as small as desired. The unmistakably identifiable sensation of the airstream coursing swiftly over the tip of the tongue as it directs the column of air into the reed/mouthpiece tip opening validates that the tongue has successfully shaped and delivered the column of air to the velocity point.
3. Increasing the Velocity
To achieve optimum velocity, it is necessary to create a small opening at the velocity point through which the column of air from the oropharynx will flow and be delivered to the tip of the reed. There are three elements involved in forming the most ideal aperture:
- the tip of the tongue
- the tip of the reed/mouthpiece complex
- the hard palate just behind the upper front teeth
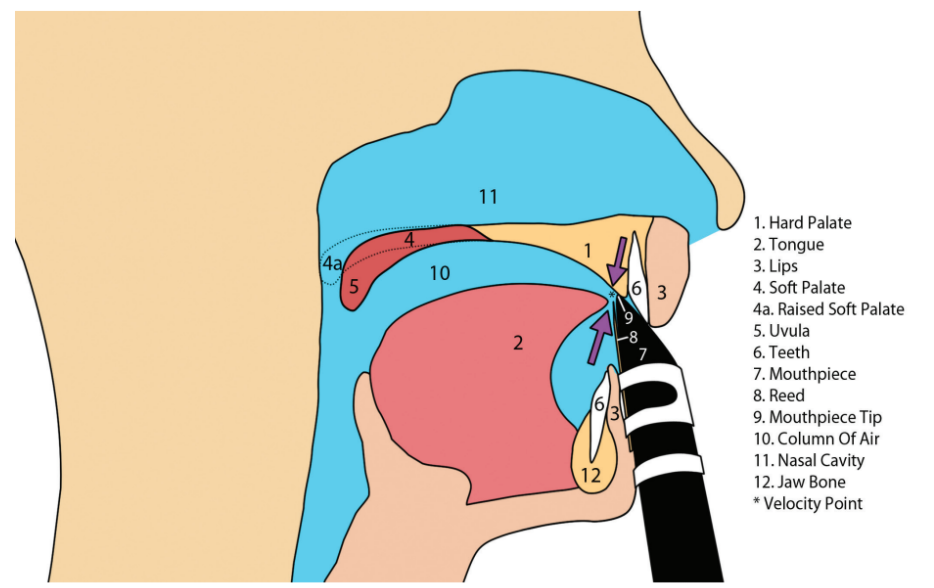
These must be brought into close proximity to “squeeze” the air through to the reed (see Figure 5). It is important to recognize that it is the velocity of the stream of air that creates the smooth connection of notes and achieves the best result, not an increase in pressure exerted. The smallest aperture possible creates the maximum velocity. Using the so-called “diaphragmatic push” in attempting to get a better legato between the notes by increasing the pressure – and therefore the loudness – only creates a crescendo to the next note. It is counterproductive.
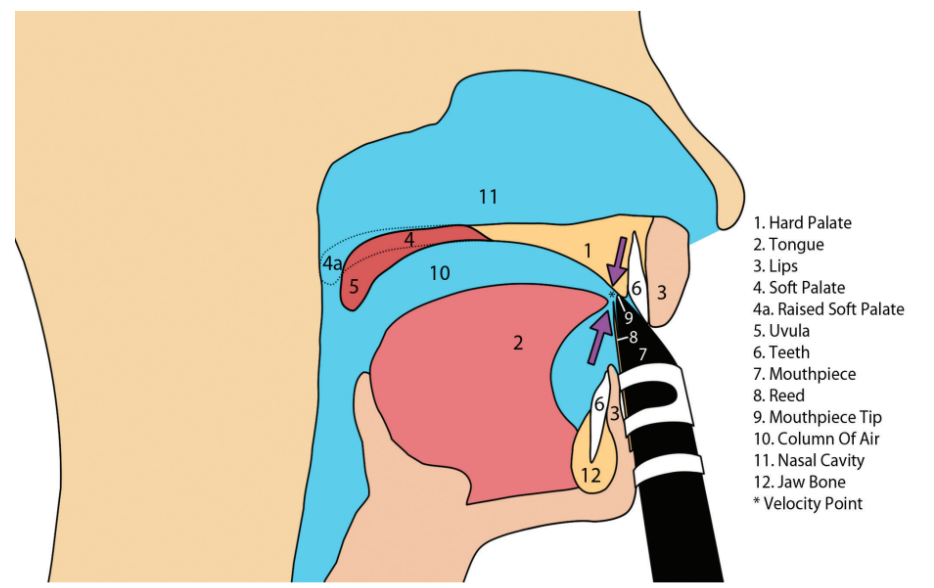
Figure 5: Tip of the tongue positioned for optimum velocity
Of the three structures that form the small aperture, one is immobile: the hard palate directly behind the upper anterior teeth. It is a fixed anatomical tissue.
The placement of the second element, the tip of the reed/mouthpiece, is an adjustable factor that can be brought close to the hard palate. The location of the tip of the mouthpiece depends upon certain variables. For most clarinetists, placing the tip of the mouthpiece nearest the hard palate would necessitate holding the clarinet down closer than usual to the body. Such a position pivots the beak on the edge of the upper front teeth and brings the tip of the mouthpiece close to the hard palate – or in some cases it may even rest on the hard palate.
The most mobile and flexible of these three structures is the tongue. To form the tongue properly in shaping the column of air it is helpful to gently retract the lower jaw, arching the back of the tongue. The laterally flattened and arched tongue then is placed closest to the reed tip.
Eliminating increased air pressure “between the notes” and replacing it with an increased velocity of the air stream allows for a smoothly connected legato at any volume.
FAMOUS EXAMPLES
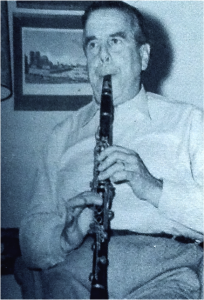
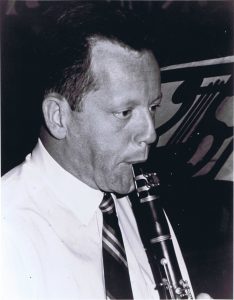
Two clarinetists, Daniel Bonade and Robert Marcellus, were particularly famous for their superb legatos. As a student of Bonade and Marcellus, the author noted that each of them drew back the upper lip and held the clarinet in this downward position, placing the mouthpiece tip close to the palate. They also both felt that to attain a beautiful clarinet sound, the tip of the tongue must be very close to the reed.
Such a conjoining of the three important components – the tip of the tongue, the tip of the reed, and the hard palate, plus raising the soft palate – is ideal for creating the smallest aperture through which the larger column of air can be “squeezed” to achieve maximum velocity. It is appropriate also to recall that Marcellus and Harold Wright, in their teaching, both emphasized the need to have the tip of the tongue close to the reed to produce a beautiful clarinet sound.
Listen to Marcellus in the Szell Schubert Octet recording, or in his solos in the Szell recording of the Rosamunde Overture, and to Bonade in the rapidly ascending and descending solo in Scheherezade.
- Figure 6: Daniel Bonade (left) and Robert Marcellus; note the position of the clarinet with the tip of the mouthpiece near to or touching the palate
PRACTICAL METHOD
The following is a step-by-step method for finding the optimal approach to suit each individual’s anatomical configuration. We are all built similarly but not identically. There are a great many variables in oral and cranial anatomy and mouthpiece shape that obviate the likely success of dictating fixed rules for positioning the mouthpiece, lips and tongue in an individual’s mouth. A short list would include: size of the tongue, alignment of the teeth, degrees of overbite and overjet, height of the vault of the palate, thickness of the lips, chin prominence, and the curvature of the beak of the mouthpiece and its tip.
The approach proposed here establishes an ideal method for achieving the optimal results for each individual. Clearly, each clarinetist needs to adapt the principles to his or her particular anatomical composite. The idea is to set the ideal approach as a point of departure and approximate it as closely as possible.
Positioning the Mouthpiece, Tongue and Soft Palate
Start by placing the tip of the mouthpiece so that it gently rests against the anterior hard palate (the gum tissue directly in back of the two upper front teeth). For most clarinetists this would require holding the clarinet closer to the body, possibly raising the head and gently drawing back the lower jaw. This permits the lower lip to support the reed and allows it to vibrate more freely. This also positions the back of the tongue properly, arches it toward the palate and extends it laterally so that the tongue’s sides sit over the biting surfaces of the back teeth and rest against the cheeks. In this position the tongue will shape the column of air properly for its delivery to the reed. The tip of the tongue is then placed close to the reed tip, creating a small opening through which the column of air will flow. The upper lip in single-lip players is then curled up against the facial surfaces of the upper teeth and pulled back. This position creates a larger volume of air in the oropharynx by automatically raising the soft palate. Double-lip players reflexively do this and it is the reason why most single-lip players, when experimenting with the double-lip embouchure, notice that there is a difference in the quality of the sound.
The “Lisp Technique” for Positioning the Tongue
To locate the proposed position for the tongue tip, say “s” as though you were lisping. Place your tongue between your upper and lower teeth and produce an unvoiced “thhhhh.” Keep the air flowing and slowly draw your tongue back into your mouth as you continue forming the “thhhhhh” sound until the tip of the tongue follows the surfaces of the back of your upper front teeth and rests just above and behind them. The column of air at a given point will cause a whistle to be heard. It will sound like a tea kettle at the boiling point. This method establishes
the recommended placement for the tip
of the tongue.
You can test this method on the very delicate F-sharp entry at the beginning of the Copland Concerto, or the first ppp entry on an A above the staff in Piazzola’s Oblivion. Experimenting with these entrances helps establish what it is like to feel the air column flow over the tip of the tongue. A practical approach would be to begin with steady air pressure, place the tip of the tongue lightly on the reed and slowly remove it, sliding the tip upward close to the palate, keeping it in the position where the note first appears at ppp level. Then hold a long tone there to get the feel of the air column flowing over the tongue tip.
Another hint is to try the “Detachés” etude from JeanJean’s Vade Mecum du Clarinettiste. The flutter-tonguing brings the tip of the tongue directly behind the most forward part of the hard palate, the gum tissue just in back of the upper anterior teeth.
Practical Considerations and Adjustments
In many cases, holding the clarinet at such an acute angle may be nearly impossible. The author, for example, has a prominent chin, which impedes achieving the recommended ideal position and limits how closely the reed tip may approximate the palate. Clarinetists with an underbite will experience the same limitation. In such an instance the tip of the mouthpiece may be lower in the mouth than prescribed. The tip of the tongue, however, can still be placed close enough to the reed and palate to create a sufficiently small opening that will function quite effectively in increasing the air velocity. This position also sets up an interesting way to articulate since the under (ventral) part of the tongue may then contact the tip of the reed for a distinctive articulation. This can feel strange at first, but it is highly recommended for experimentation and possible adoption for some as a permanent way to play. Once these initial steps become routine, what at first was felt to be a bizarre approach becomes a comfortable norm.
Each player, in order to apply these principles, must find his or her most appropriate position for placement of the tips of the mouthpiece and the tongue along with the position of the lower jaw and action of the lips. The degree to which this method may be approximated by each clarinetist will depend upon the anatomical configuration of all the individual structures involved.
Pressure and Velocity
Once more, a word about the relationship of pressure and velocity as it relates to clarinet playing: An increase in pressure will create an increase in loudness, but an increase in velocity ensures the continuity of reed vibration, which is important in achieving the goal of “playing between the notes” (the legato) at any dynamic level. Another practical application of this method is quickly appreciated when, at the end of a phrase, a note is held in a tapering diminuendo. Try holding a middle-line B starting at forte and slowly diminishing to a pianissimo. The closer one approaches ppp, the more difficult it is to sustain the note. As this occurs, slowly and delicately raise the tip of the tongue closer to the palate. This will squeeze the column of air even further, making it possible to keep the reed vibrating, thereby continuing the diminuendo with no change in pitch. It takes practice and also works very well in the upper registers. Remember that increasing the pressure makes the sound louder. Increasing the velocity of the air column keeps generating the sound even at delicate dynamic levels.
FINAL THOUGHTS
With careful application of these principles it is possible to devise an efficient and highly personalized method of forming the optimal shape and delivery of the column of air for each individual. This will facilitate the achievement of a centered tone and as optimal a legato as is possible given the various anatomical structures of each individual and the equipment used.
It is hoped that the application of
these scientific fundamentals to the arts
of teaching and playing the clarinet will help in understanding the importance of the principles of fluid dynamics in achieving a beautiful clarinet sound and lovely legato. v
Further Reading
Hopstock, H. “Leonardo da Vinci (1452-1519),” Quaderni d’anatomia, I-VI: Fogli della Royal Library di Windsor, pub. C.L. Vangensten, A. Fonahn,
H. Hopstock.
Keele, K.D. Leonardo da Vinci on Movement of the Heart and Blood. London: Harvey and Blythe Ltd., 1952.
Endnotes
1 G.K. Mikhailov, “Hydrodynamica,” in Landmark Writings in Western Mathematics 1640–1940, ed. Ivor Grattan-Guinness (Elsevier, 2005), 131-42.
2 G.K. Batchelor, An Introduction to Fluid Dynamics (Cambridge University Press, 1967).
3 L.J. Clancy, Aerodynamics (London: Pitman Publishing, 1975).
4 Walter G. Kent, An Appreciation of Two Great Workers in Hydraulics: Giovanni Battista Venturi, Born 1746, Clemens Herschel, Born 1842 (Ann Arbor: University of Michigan Library, 1912).
5 Luis Rossi, “Two Personal Voices, Anton Stadler and Richard Muhlfeld,” The Clarinet 42, No. 3 (June 2015): 59-62.
6 Alison Evans, et. al., “The Role of the Soft Palate in Woodwind and Brass Playing,” International Symposium of Performance Science (2009): 267-272.
7 Leon Russianoff, personal communication (1965).
8 Alison Evans, “The Role of the Soft Palate in Woodwind and Brass Playing.”
About the Writer
Clarinetist, composer and teacher Ron Odrich has played and recorded with Clark Terry, Zoot Sims, Al Cohn, Phil Woods, Buddy DeFranco and others. After a tenure as soloist for the U.S. Air Force Band “Airmen of Note,” Ron went on to perform with the Vinnie Burke Quartet, Clark Terry (small and large orchestras), the original Broadway cast of “Lenny” and his own quartet. His first album was with jazz greats Vinnie Burke and Chris Connors in 1955, and his 1978 solo album Blackstick was given a four-star rating by DownBeat magazine. As a 2003 Grammy nominee with over 14 recordings to his credit, Ron also possesses eclectic talents as a visual artist, a published novelist and a periodontist with his own practice in Manhattan.
Comments are closed.