Adjusting Reeds for the Beginner to Advanced
Basic tools to cover all angles
by Maryanne Lacaille
This article was written for the ICA Social Media Committee’s March monthly campaign initiative to discuss reeds.
To get involved with one of our committees, you can find more information here.
—
I’ve been researching some interesting ideas and new concepts lately on simple reed adjustments you can do using a few tools. Of course my motivation has always been to try to address the age old problem of “how to find a good reed.”
To me, what makes a good reed or a great reed is highly personal and I feel every player has his or her own combination of embouchure, mouthpiece and instrument. I will keep “branding” out of this presentation for legal purposes. Most players already know what they want to sound like and have their own concept of a desirable sound, whether that be bright and sparkly or deep and dark.
Basic reed adjustment: only scratches the surface. I have to leave out a large amount of information in the effort to be precise.
Minimum Tools: Reed Knife- I prefer a beveled-edge which comes in both right and left handed. A sharpening stone-should have course and fine sided. Sandpaper; #400 and #600 grit. The #400 is best for shaping and the #600 is best for polishing. I use scissors to cut triangle-sized squares and cut those down to half inch strips which I use for precise work. Last but not least is a flat surface made of glass or plastic plaque 4”x6” more or less.
Super-minimum tools (suggested for beginners): (1) One sheet of #400 and #600 wet-or-dry sandpaper (2) Flat surface 4”x 6” like a sheet of plastic (3) As above use scissors to cut into rectangles or squares.
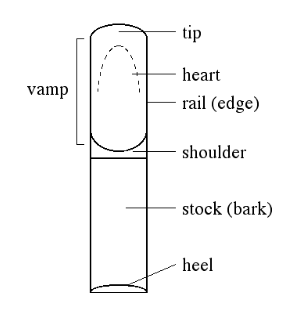
Reed Selection: Some reeds have more potential than others. I start with a box of new reeds or a pile of your old-barely-played-but-rejected reeds. Choose a few that meet the following criteria: Hold the reed tip to a strong light. You should see an opaque part (heart) which should be more or less an inverted “V” shape. The tip and sides should show the light and be more or less symmetrical between the left and right sides. The xylem/phloem bundles should also be symmetrical and finer is better. These fibers are the hardest part of the wood along with the bark. The cut at the shoulder (middle of the reed between the stock and the blade) should be symmetrical. The heel at the bottom of the reed aka the end of the stock should be symmetrical showing edges of equal height. The upper “bark” side should show an even curve at highest point right in the middle.
Start with 10 good candidates. Show an even curve with the highest point in the middle. With skilled adjustment you may end up with eight reeds that are at least playable with one or two of them superior.
Different brands and models of reeds have different dimensions and may be made from cane that has been chosen for different qualities. You will want to find a brand and model that seems to work with your mouthpiece embouchure and playing style. If you already know what works for you, you may wish to stay with it. If not, try a few each or some different brands as an experiment.
Reeds out of the box will change as they are played. A reed can be great one day and awful the next day. The introduction of moisture to a dry reed and subsequent drying out will cause swelling and warping. The stress of being played will also contribute to warping. The art of reed adjustment is about dealing with these constant changes.
BREAKING-IN-PROCESS: It’s probably safe to say that most clarinet players, including many or most professionals, just open a box and try reeds, picking the good ones out and discarding the rest – perhaps with some effort at mild adjustment but without a “break-in” period. However, I feel to some extent that a gradual breaking-in process is needed. Below is a basic summary so if you are in a hurry, or don’t completely agree with this logic, you can adapt it to your needs – for example, by shortening the process to just a couple of playing sessions. OK… so here we go!
The concept is to play the reed for only a few minutes each day for perhaps 4-10 days making very minimal adjustments each time. This way the reed will only gradually begin to exhibit the warping and swelling pattern inherent in that particular piece of wood as you simultaneously try to improve it. In addition, the reed will gradually “learn” to conform to the shape of the mouthpiece facing. At the end the surface will become sealed somewhat and the reed will become less prone to change. At the end of this process you will have a more stable reed. At each playing session, I personally moisten the “inky” part of the reed either with clean water or saliva (players have differing opinions on that) then play for 3-5 minutes evaluating what adjustments might be necessary. When you think you know what needs to be done, try your adjustment by play-testing after each small knife stroke, sanding or clip. For the first few days dry the reeds flat side up when you are done working on them. After perhaps three sessions put them away after each session in reed holders designed to keep the bottom flat.
Vamp and Tip Adjustment: Adjustments should be gradual. In the first session, concentrate on the part of the vamp (upper surface of the reed blade) nearest to the shoulder. If your low notes are stuffy, scrape or sand here lightly trying to preserve balance and avoiding the middle of the reed. If the entire reed seems hard, I use a small piece of #400 sandpaper to lightly sand the entire vamp starting at the shoulder and stopping short of the tip. Don’t try to perfect the reed at this point; it is too early. Be satisfied with a small improvement and put the reed away for the day. Do this with each reed in your batch.
In the next several playing sessions, concentrate on balancing the reed. Use the sandpaper strips or reed knife to very lightly scrape the lower and middle vamp as necessary. The object here is to equalize the vibrations of the left and right sides.
Here are three ways I use to check balance: Turn the mouthpiece clockwise so that your embouchure only controls the right side with the left side of the reed free. Blow an open G then turn the mouthpiece the other way to free the right side. If the “free” side (L or R) seems stuffy compared to the other, some wood should be removed from the stuffy side. I have had very good results with this method! Hold the reed up to the light to look for symmetry. An asymmetrically darker area or an area with thicker fibers may have to be thinned slightly, so I scrape that lightly with knife or use a thin strip of sandpaper. The L-R balance of the tip can be checked by using your forefinger to flex each corner, in turn. You are looking for equal flex. If one side seems stiffer, use a thin strip of sandpaper to lighten the inner part of the flexing tip where it meets the heart and avoid sanding or scraping the tip edge itself. Hold off on that. Another trick I have developed is to “bend” the rails and tip into the mouthpiece facing very gently using both your thumbs so as not to break the tip. What this does is “molds” the reed to that particular mouthpiece. The downside to that however is once you “bend” or “mold” that reed to a certain mouthpiece, it is difficult to use that reed on another mouthpiece, for example if you are doubling on Bb/A and need a different mouthpiece for a different clarinet. In balancing, remember that the “fibers” are the hardest part of the wood.
An important part of tone adjustment is the amount of high overtones in the sound. The high overtones are largely determined by the tip of the reed. If a reed is too bright (or if it is generally too soft) the tip may be clipped using a reed clipper. Take only a tiny amount off and play the reed to check the result. A very small clip can make a huge difference.
If the reed lacks high overtones, use a small strip of #600 sandpaper (or a delicate stroke of your knife) to lightly thin just below the tip to the left and/or right of center. Try for balance. Work in small increments checking your result by blowing a few notes after each couple of strokes.
Generally speaking, response of low notes is adjusted at the sides of the bottom of the vamp near the shoulder. Middle notes are adjusted on the sides of the middle of the blade and highs toward the tip. If possible try to avoid sanding or scraping the center (heart), or the extreme tip of the reed.
You can use the left/right balance test to adjust response of low and high register and, if your low notes are stuffy, perform the left/right. If you overdo the scraping or sanding and the reed becomes too soft, you can clip the tip then try to re-shape and re-balance the reed (but for me that’s a lot of work!).
Warps: Reeds will warp in the normal course of being moistened/played/dried. Warping can occur on either the top (vamp) or the bottom (table surface). Warping on the bottom of the reed can spoil the seal of the stock with the mouthpiece causing uneven vibration and possible air leaks. To combat this, I run the flat blade of the reed knife lightly over the reed table to flatten it removing only a small amount of wood dust. Do this each day for the first two or three days of the break -in- process (after a few minutes of playing) and later on as necessary.
If a more severe warp develops, the bottom may be flattened by rubbing it lightly over a plain sheet of typing paper. I prefer using typing paper over sandpaper. A bit of advice is to pass the reed a few swipes across the paper. I prefer the back to have a bit of roughness to allow for a warp if it occurs.
If the tip appears warped or “crinkled”, don’t worry about it! The waviness will come out in the course of playing. You can get it started by straightening out through holding the wavy tip flat with your thumb against the flat table of the mouthpiece for 30 seconds or so.
Weather: High humidity can cause drastic changes in reeds. They can warp, become heavy and respond poorly. Don’t adjust the reed much or at all on a rainy day. When the weather dries out the problems may largely disappear. If you try to make a perfect reed on a wet day you may later find that you have drastically over-cut the reed. Very dry weather can cause unwanted changes too. (I don’t have that problem much here in the Seattle area).
Continuing Adjustment: Even if you think you are finished with the adjusting and have an excellent reed, it will change over time and may need further balancing or clipping. With use, both sides of the reed will accumulate a thin layer of deposits (I call them gunk) from evaporated saline, dust, etc., which will stifle vibration and deaden the tone. On the top of the blade, this may be removed with very light strokes of the reed knife or better yet with your fingernail. To clean the bottom, run the flat blade of the reed knife lightly over the entire surface starting at the heel end and stopping just short of the tip.
Don’t forget to brush your teeth before playing, or at least rinse your mouth. Your reeds will last longer. After each practice session, you should, if possible, rinse off the reed with clean water and wipe it dry.
Reed placement can enhance performance to some degree. If your reed blows hard try moving it down on the mouthpiece so that the tip of the reed barely overlaps the tip rail of the mouthpiece. If the reed blows soft then trying moving it up so that the reed tip completely covers the tip rail and it will blow a bit stiffer. This can help in last-minute adjustments right before a performance or can serve as a test to see if the reed should be either scraped, sanded, or clipped.
I use the word “clipped” carefully as I prefer only sandpaper as a first option and then move to a reed knife as second option. I personally play mouthpieces that have a deep baffle and closed tip opening and so we are really dealing with micro-adjustments.
Regarding ligatures and placement – I have found over the course of many decades of playing that ligatures with “more material in them” result in a darker sound and vice-versa.
Rotating Reeds: Because reeds can be temperamental, especially when the weather is changing, it is very important to have multiple reeds broken in all the same time. I recommend at the very least you should have four reeds “ready to go.” This will ensure you will always have a reed that works even when the weather changes drastically on the day of the performance.
In addition to prolong the life of your reeds, you should cycle through all of your reeds that are broken in. Whenever you play on a reed, place it at the end of the rotation and number them 1-10; allowing reeds to rest will make them last longer.
I never store my reeds in the case they came in. This individual plastic piece from the manufacturer is not designed for wet reeds. Its sole purpose is to keep reeds from breaking while they are shipped; it does not promote even drying of the reed and it actually increase the likelihood of warping. Instead, purchase a reed case or two. If your reed case does not have some kind of humidity control built in, this is something you need to consider during the winter months.
Again while attempting to not include “branding,” there are several great humidi-packs on the internet as well as a trick I have used which are “dampits” for strings. I get the violin dampits which fit perfectly into the top joint of your clarinet. Simply soak the dampit in water till it is completely saturated and wring it out and place inside the joint.
When to call it quits: Eventually every good reed comes to its end. But when? Personally I base this decision on how a reed plays for two consecutive days, and it if doesn’t respond well (and after I’ve tried re-adjusting it) for two days, and whether or not it meets the wall test. If a reed has any visible chips, it needs to meet the wall “test” right away.
—
About the author:
Maryanne Lacaille maintains a Zoom studio of 38 students from around the world teaching from her quaint and elegant houseboat on Lake Union in Seattle. She holds degrees from Boston and New England Conservatory
studying from Harold Wright and Peter Hadcock. Maryanne has traveled to over 28 countries and several continents, including Africa, Europe, Asia Pacific, Thailand, South America and most recently Oaxaca, Mexico in 2019, where she worked within academic borders for underprivileged students to promote music in education sectors.