
Originally published in The Clarinet 52/4 (September 2025).
Copies of The Clarinet are available for ICA members.
From the ICA Committees
by the ICA Pedagogy Committee
TONE AND TECHNIQUE, PART I
At the 2024 ICA ClarinetFest®, the ICA Pedagogy Committee gave a presentation titled “Tone and Technique.” This collaborative article based on the presentation provides a variety of perspectives, techniques, and common goals for developing a healthy tone concept through a focus on air and embouchure; exercises for beginners who are developing a tone concept; a study on voicing for beginning, intermediate and advanced players; and finally, ideas toward refining the core to our sound through evenness in the registers.
AIR AND EMBOUCHURE
by Kylie Stultz-Dessent
It was the sound of the clarinet that first drew me to the instrument. Its range of registers offers boundless expressive potential, allowing for both profound lyricism and dazzling technical brilliance. Since no two tones are identical, as a clarinet teacher my ultimate goal is to help my students achieve a characteristic clarinet tone—one brimming with overtones, richness, and vibrancy. To accomplish this goal, we must break down the elements that contribute to your clarinet tone. The most important element in producing a good sound is the use of air. Quite simply, if the air is not supported and constant, the sound will be lacking.
The way in which we use our air influences not only our tone quality, but also our musicality, phrasing, dynamic control throughout the registers, and the responsiveness of articulation. In order to develop proper breathing technique, it is necessary to become familiar with the fundamentals of good breath support and the role of the diaphragm. The diaphragm is composed of muscle and connective tissue and rests at the bottom of the chest cavity. During inhalation, the diaphragm flattens, creating a vacuum in the chest cavity and allowing air to enter into the lungs. This downward motion of the diaphragm is assisted by the muscles of the abdomen, side, back, and waist area during inhalation. As you exhale, the diaphragm relaxes and moves up to its natural resting place. When playing the clarinet, we must resist the natural upward motion by engaging the abdominal muscles to create an intense and concentrated steady stream of air.
To practice this concept of supporting, place your hand on your abdomen. Take a breath and notice the expansion of your abdominal area. (Remember to keep your shoulders down and relaxed.) As you exhale, resist your belly moving back towards the spine. Once you have achieved this skill away from your instrument, return to the clarinet and implement this breathing technique in your long tone exercises. Use a mirror to watch for expansion of the waist area while breathing. Gaining control of your airstream not only improves the sound you produce, but also provides you with limitless tools for musical expression.
The embouchure plays a vital role in refining tone quality, controlling pitch, and supporting consistent sound production. The basic shape of the embouchure includes the bottom lip pulled tightly against (and slightly over) the bottom teeth. The chin skin should be pulled taut, revealing a shallow valley from the tip of the chin to the bottom lip. The top teeth should rest on the mouthpiece and the corners of the mouth should be pulled in towards the mouthpiece. Keep the top lip snug against the top teeth and pressed down onto the top of the mouthpiece. The aperture created by the inward direction of the corners is very small and round. Use the syllable “oo” to find the correct shape. Building the embouchure away from the clarinet with a mirror is essential to developing good habits. Insert the mouthpiece at an angle between 35 and 45 degrees and keep your head aligned with your spine. Avoid tilting the head down or forward. Experiment with the amount of mouthpiece you insert into your mouth. Too much mouthpiece will result in a spread, unfocused sound, while too little mouthpiece will cause a pinched and small sound. It is crucial that your embouchure maintains this basic position at all times. Watch for unwanted pockets of air in the cheeks and lips as you exhale into your instrument. Practice long tones using a mirror to monitor the embouchure shape in your daily warmups.
VOWELS AND VOICING
by Caitlin Beare
Voicing refers to the position of the tongue inside the oral cavity. The tongue’s mobility sets it apart from the rest of the vocal tract anatomy, making it a logical choice for manipulating sound production on the clarinet. Ultrasound studies have found that tongue position typically remains high throughout the chalumeau register and descends as the pitch ascends throughout the clarion and altissimo registers.1 While this may seem daunting to beginner clarinetists, consider that we naturally shape our tongue into various positions when speaking. Therefore, practicing voicing on the clarinet is simply an extension of what we already know.
Emulating different vowels is an excellent method for practicing and teaching voicing on the clarinet. Commonly-used vowels include “ewe,” “eee,” and “ooo,” with each yielding slightly different results. The goal with each of these vowels is to position the tongue so that the sides touch the top molars, while the middle and front of the tongue remains arched and forward like a “hiss.” Experiment with changing the voicing—moving the tongue inside the oral cavity or shifting between vowels—on a single pitch and notice how this affects tone quality and intonation.
As you become more aware of your tongue position and start to feel comfortable with the different vowels, try the exercises in Figures 1, 2, and 3.
The beginner exercise (Fig. 1) becomes challenging as you descend, so ensure that the embouchure and tongue position remain stable and that you are using a fast, cold airstream to maintain the upper note.
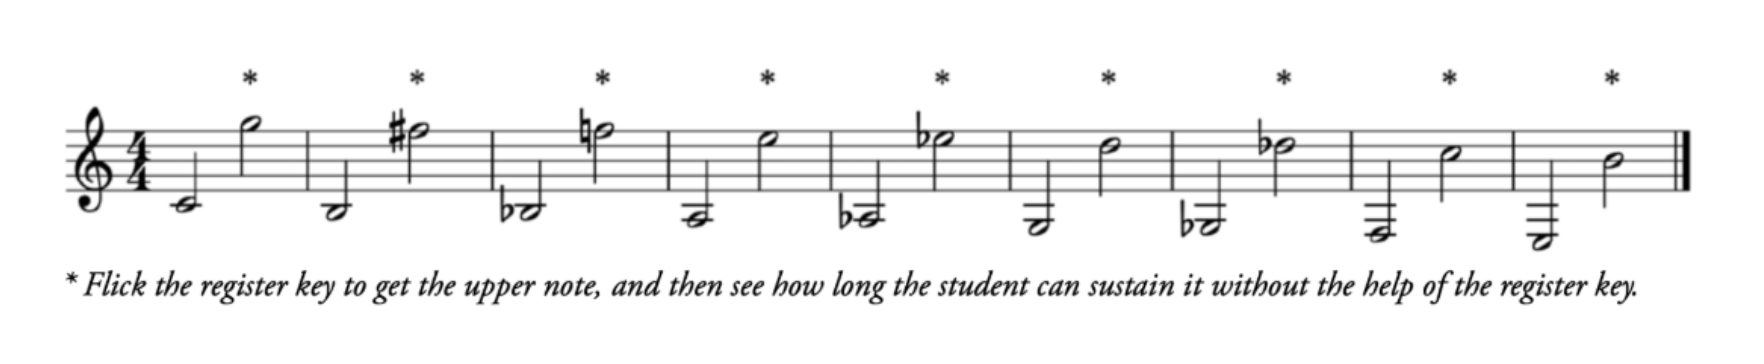
Figure 1: Beginner exercise, from Tiffany Valvo, “Refining Fundamentals through Extended Techniques,” The Clarinet 47 no. 2 (March 2020): 34-37.
The intermediate exercise (Fig. 2) is especially challenging to play slowly. Strive for a fast airstream as you descend: How far can you get before the note cracks?
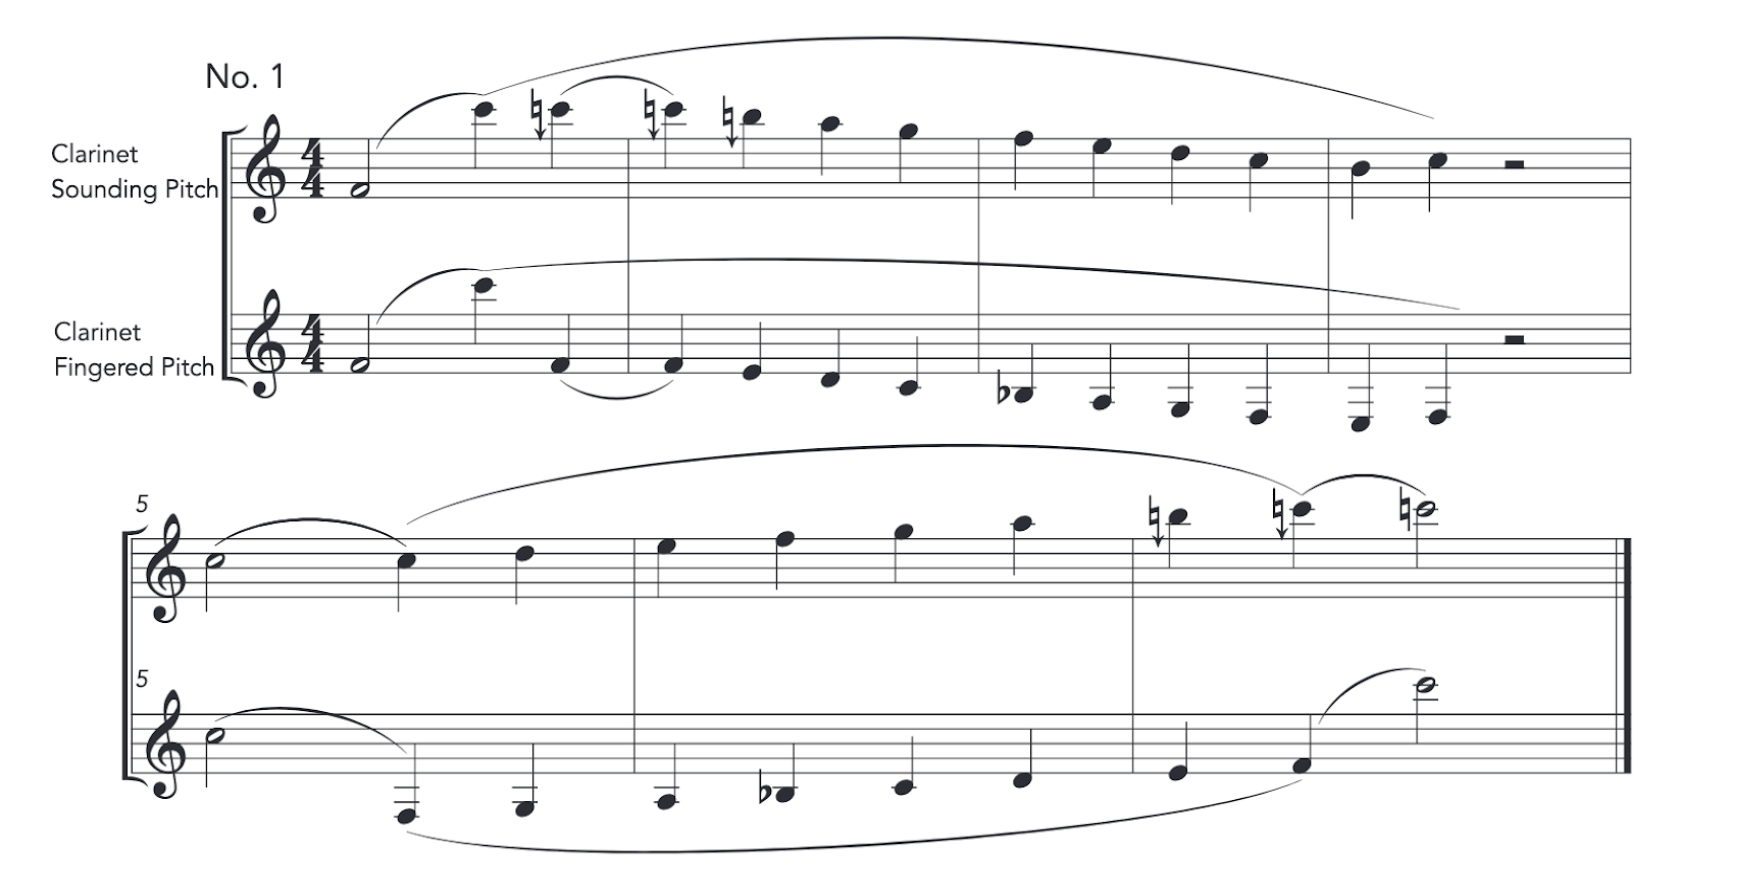
Figure 2: Intermediate exercise, by Caitlin Beare
As in the previous exercise, in the advanced exercise (Fig. 3) the top line refers to the clarinet’s sounding pitch while the bottom line refers to the fingered pitch. Think about hitting different “nodes” on the reed to produce the higher partials.
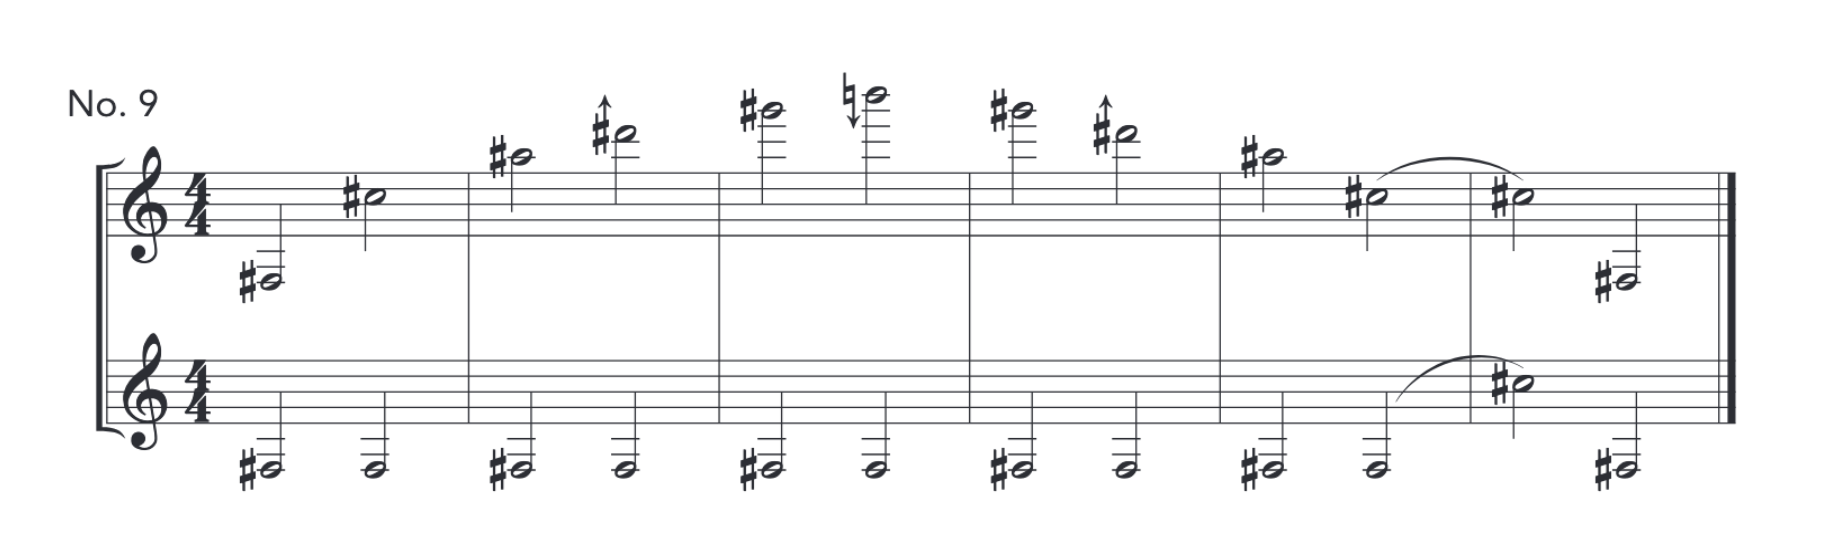
Figure 3: Advanced exercise, by Caitlin Beare
FUNDAMENTALS: VOICING AND INTONATION
by Jennifer Willsea Branch
Perhaps your first-year clarinets sound unison on all the introductory left hand notes, C, D, E, F, and G, but suddenly do not sound unison when learning throat tone A. Perhaps your second-year players sound unison pitch on the notes over the break, until they encounter new note clarion A. Perhaps your third-year players sound unison pitch on new altissimo notes C, D, and E, but you find that not everyone is able to raise the pitch to an entire half step to reach F, while others may even pop down an entire register upon learning that fingering. Why does simply playing a chromatic scale not allow us the classic Rhapsody In Blue glissando—what else is needed? What all of these scenarios share in common is the need to understand voicing.
On Day One, set the “tone” while keeping it basic. Before assembling the entire instrument and instructing young clarinetists how to hold their instrument, keep it basic and help them understand the importance of how embouchure, air speed, and voicing directly correlate to the tone we create. Using mouthpiece and barrel alone creates a direct window into what our tone will be once we assemble the instrument and especially once we enter the world of high notes. The ideal target starting pitch for mouthpiece and barrel alone should be concert F-sharp. Encourage your young musicians to get off on the right foot by checking their pitch daily with a tuner before assembling the entire instrument.
Once concert F-sharp is reliably sounded, go further by asking your young musician to intentionally bend their pitch lower, hold, then raise it to the original pitch. Figure 4 shows an exercise to try pitch bending.
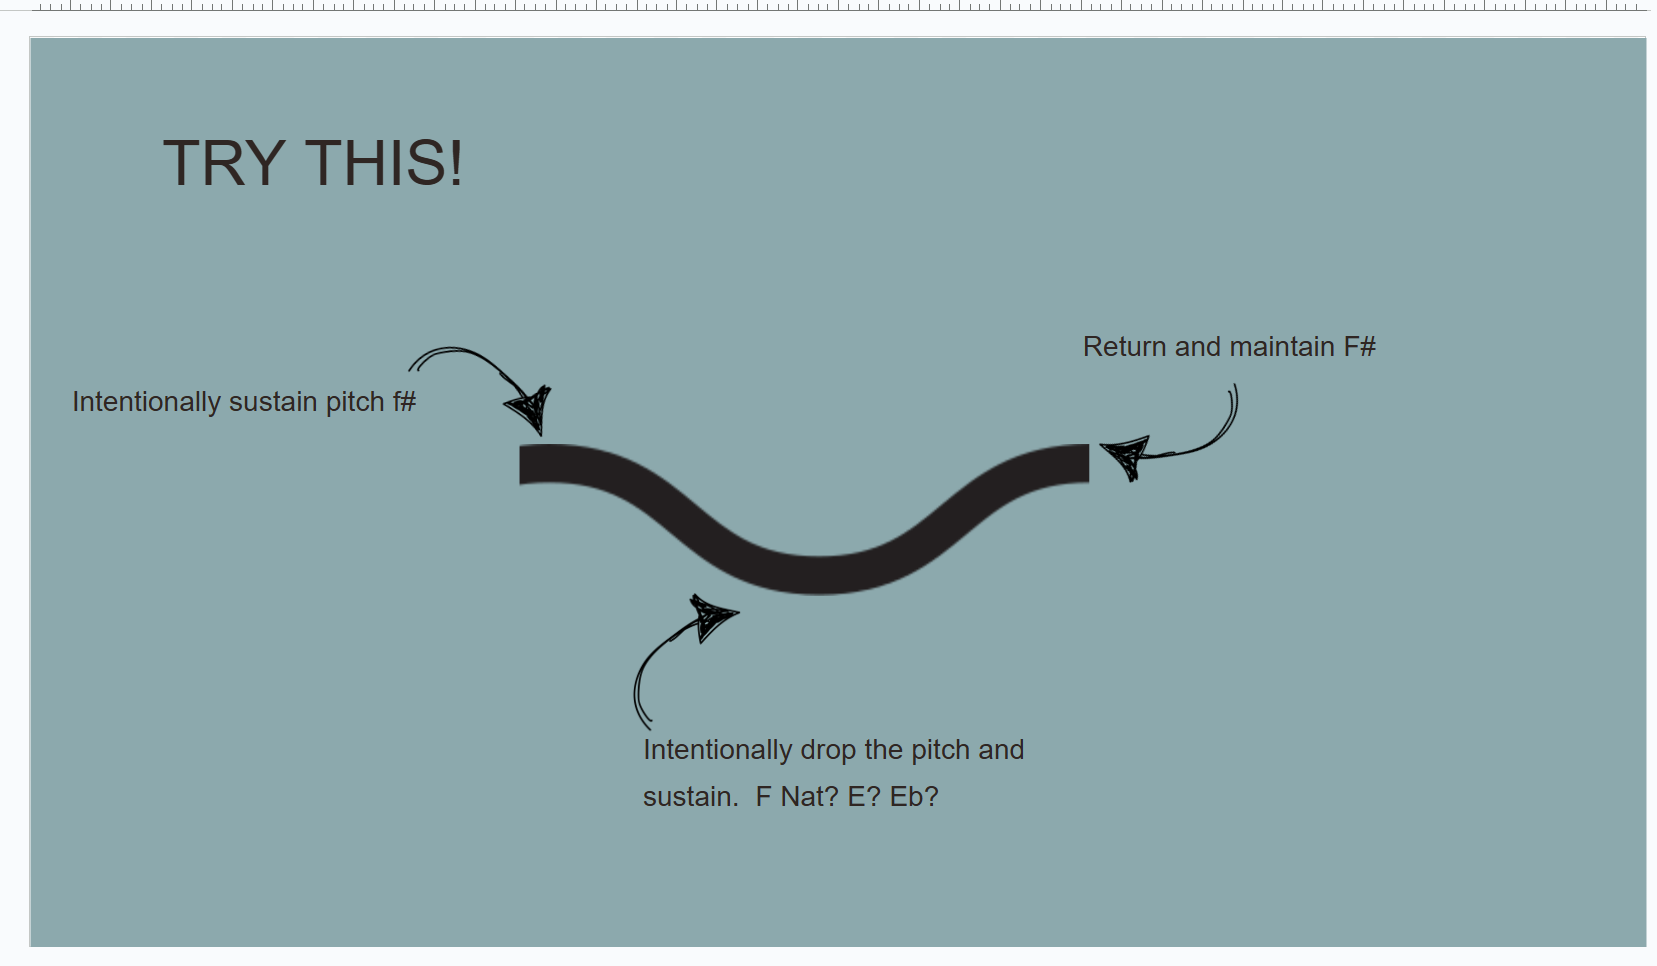
Figure 4: Pitch-bending exercise on mouthpiece/barrel
Once we can reliably bend our pitch at least a half step, registering an F, or even better, an E or E-flat, we can with confidence know that we can control which pitch originates at the mouthpiece before entering the whole instrument.
Still with mouthpiece and barrel alone, have your student record on paper 10 attempts at pitch bending, or if you have a section of clarinetists, perhaps go around the room and let everyone give it a try—drawing a visual representation of the starting, middle, and ending pitch of each attempt (see Figure 5). Creating a symmetrical visual representation allows your clarinetists to understand how speed of wind, embouchure, and back of tongue (or voicing) play a role together to impact our tone, and to do so with consistency and repetition.
Figure 5: Visual representation charting a student’s attempts at pitch bending
I’m having trouble. How do I intentionally bend the pitch?
Our highest pitch is similar to a “hee” shape. Our lowest pitch is similar to a “haw” shape. Especially by whispering these vowel shapes, we can better understand the role the back of our tongue plays in shaping the air into the mouthpiece (see Fig. 6).
Figure 6: Pitch bending with voicing
Advancing onwards to the Rhapsody in Blue intro is a combination of pitch bending, voicing, and finger sliding, but the concepts here create a healthy introduction toward the steps necessary to the clarinet’s classic glissando. More importantly, it sets the groundwork for your young clarinetists to better match pitch, and to understand the pitch/tone relationship.
FUNDAMENTALS OF TONGUE POSITION, ARTICULATION, AND WARMUP STRATEGIES
by Joshua Gardner
TONGUE POSITION
The tongue is a complex structure consisting of five extrinsic muscles that are responsible for large gross movements, and four intrinsic muscles that control fine movements and shapes. Together, they create what’s referred to as a muscular hydrostat—it can change shape while retaining a constant volume without relying on an internal skeletal support system. Other muscular hydrostats we see in nature include an elephant’s trunk, the tentacles of an octopus, and other mammalian tongues. The incredible range of motion and shape that the tongue can produce allows us to phonate speech sounds, swallow food and water… and play the clarinet! However, with that freedom comes great responsibility—we must learn proper articulatory and non-articulatory tongue motion just as we learn proper finger motion.
In addition to the more tangible articulatory functions, the tongue also has non-articulatory responsibilities. Much like in speech, when we say different vowels, the tongue allows clarinet players to manipulate the acoustic conditions of the vocal tract necessary to play the full range of the instrument. For example, our entire upper register is contingent on proper tongue dynamics. I use the term “dynamics” instead of “position” because proper tongue position is relative to the note being played rather than a single shape. So, unless we’re playing just a single note, we should expect the shape of the tongue to change, especially when we’re playing above written clarion E.2
Voicing tips:
- What happens inside the mouth is critical for successful performance—it cannot be ignored.
- Tongue position affects the acoustic interaction between the vocal tract and the clarinet.
- The tongue is dynamic, not static, especially above clarion E. See my “Clarinet Tongue Motion Archive” playlist on YouTube.
- Proper tongue dynamics allow us to play the full range of the instrument with flexible intonation, characteristic tone quality, and numerous special effects.
Exercises for developing lingual awareness and flexibility with voicing:
- Descending/ascending glisses (avoid jaw movement—this is a function of tongue shape); range expansion in long tones, scales, and other fundamentals; register slurs with and without the register key; spectral multiphonics; exploring harmonics using regular fingerings; and using false fingerings (for example, work on stabilizing an altissimo D with the B-flat trill key fingering).
- EXPERIMENT! We do not learn lingual skills from someone telling us how to do it; we learn from a feedback loop of trying something, evaluating the result, and making small, but meaningful, changes to improve the result. Imagine the first time you ate with a fork. Was it successful? Did you accurately get food in your mouth… or was it closer to your ear? After many years and cycles around this feedback loop, your error rate is (hopefully!) very low!
ARTICULATION
Articulation, whether single or double, requires a precise skillset: we need to have a clean, clear articulation across a wide range of speeds and styles that we can use throughout the wide range of the instrument. First, we need to make sure a few other aspects of good clarinet technique are in place: a proper embouchure, adequate air support to power the vibrating reed and air column, and accurate tongue mechanics. Most importantly, these technical factors need to be independent: the embouchure should remain stable during articulation, your exhalation mechanism remains engaged regardless of whether you’re playing a smooth legato phrase or a rapidly articulated passage, and your voicing mechanism (non-articulatory tongue mechanics) should allow you to play any note while articulating without pitch/response issues or squeaks.
A clean and clear articulation needs precise tongue placement on the reed. I teach and play with a tip-to-tip contact between the tongue and the reed, meaning the tip of my tongue touches the tip of the reed. Because we cannot see it, we need to rely on aural cues to both learn what this contact feels like and to implement it throughout our technique.
Here are some steps for learning the tip-to-tip approach:
- The first step is to identify and sensitize yourself to where the tip of the tongue really is. Use a fingernail to scratch the tip of your tongue, preferably in front of a mirror. Is this where you thought it was? Is it where you make contact with the reed? Many people think their tongue tip is further back than it really is.
Next, transfer this to the reed on a mouthpiece:
- Stick out your tongue and place the tip of your reed on the spot you just identified. Bring your mouthpiece into your mouth without removing your tongue from the reed or moving it. Remove your mouthpiece from your mouth, leaving your tongue on the reed. When working with a student, you should be able to see and confirm their placement. Many students will shift to a position lower on the reed.
- Repeat the above step, but this time, compress your air as if you are about to play once your mouthpiece is in your mouth, tongue is on the proper spot on the reed, and your embouchure is set. Release the reed so you can blow that compressed air through the clarinet to play a note.
- Modify this step using just the mouthpiece and barrel. The resulting note should be an approximate concert F-sharp.
- Repeat this exercise—this is target practice!
Referring back to the fork analogy, repeating these steps will allow you or your students to develop a consistent tip-to-tip articulation technique. However, one of the most common problems I see is students touching slightly too low on the reed. They may still be touching the tip, but perhaps they are using too much tongue, which can cause problems, especially when articulating high in the range. An exercise I use frequently to improve contact accuracy is interruptions.
The tongue touches the reed but does not completely stop the sound. Consider this the most legato of articulations—the sound never stops. For this exercise to be successful, your air must be constant and powerful and contact with the reed needs to be precise and minimal. I like to think of two or three very committed taste buds doing all the work. What I really like about this exercise is the usefulness of the aural feedback it provides. The subtone pitch (“X” noteheads in Figure 7) will let you know if you or your student is touching only the edge of the reed: if the pitch is sharp, placement is accurate; if the pitch is flat, the tongue is touching lower than the edge. The cleanest articulation will occur when touching only the edge of the reed. Start this exercise on low C and gradually work higher, aiming to be successful on clarion high C.
Figure 7
For more useful information about articulation, please check out the ICA Pedagogy Committee’s 2025 TMEA conference presentation posted at www.clarinet.org.
WARMUP
A daily routine is important for honing the many skills needed to play the clarinet! Your routine is your foundation from which learning any repertoire or other technique can begin. These skills include: maintaining proper hand position to facilitate agile finger motion; developing precise and healthy adjacent and non-adjacent finger motion; breathing deeply and maintaining adequate air power so your reed responds exactly how and when you want it to respond, while supporting a characteristic sound throughout the range with accurate intonation; and articulating precisely at a wide range of speeds on any note you can play, among many other skills. With a foundation of skills at the ready, learning repertoire can be more about the music and less about the mechanics. Ultimately, our technique serves the music!
So what does this look like? In my playing and what I recommend to students is a regime of long tones, scales, arpeggios, thirds, and articulation (single and multiple). Does this routine cover any skill I might come across in our literature? Of course not, but it’s a good start. It helps me not only be consistent in my playing, but also know where my limits are… and work on expanding them! If I want to learn a new technique, I’ll allocate a few minutes in my warmup to that technique. If I’m approaching it with an open mind and actively trying to make changes in the mechanics, I know that I will eventually learn the technique. This highlights two important factors critical to success: consistency and feedback. Being persistent and consistent in my practice will yield consistent, predictable performance, as will leveraging the constant feedback loop we have in our practice: we play something, evaluate what worked and what didn’t work, make changes that support both the successful elements and address the less successful elements, then try again. Making no changes will likely yield the same results, while consistency in what we do promotes a reliable foundation of technique. Balancing change with consistency is an important skill we all must develop. Remember, learning anything takes time, patience, and persistence!
TONE REFINEMENT
by Gi-Hyun Sunwoo
Once you have established your tone, it is essential to refine it in order to fully express music as you intend. The following process can help achieve this refinement.
1. TONE MATCHING
When playing the clarinet, various factors influence tone production. The number of tone holes covered by the fingers changes, the pressure applied to the embouchure varies, and the shape of the oral cavity may also be affected. Additionally, fluctuations in airflow can lead to inconsistencies in both the quantity and speed of air, resulting in an uneven tone.
Since these elements naturally shift during performance, achieving tonal consistency is crucial for a balanced and cohesive sound. Tone matching can be practiced through long-tone exercises and scale studies. Additionally, it can be applied to phrases within a piece to ensure uniformity in tone. When playing passages with large leaps, practicing tonal evenness helps prevent certain notes from sounding either too weak or overly prominent. By refining tonal consistency, musicians can expand their expressive range and attain greater musical freedom.
2. FOCUSING AIR AND EMBOUCHURE
Once the embouchure is established and the clarinet tone is somewhat stabilized, another way to refine the tone is by focusing both the embouchure and airflow. Since neither embouchure nor air is visually observable, it is helpful to conceptualize the sound as having a “core.” To create this core, the air should be directed toward its center, and the embouchure should be shaped accordingly. This approach refines the tone, making it more focused and resonant rather than diffuse. A well-defined core enhances the projection and clarity of the sound, allowing for greater expressiveness in conveying musical meaning and nuance.
3. TONE COLOR
Once the tone has been refined using the previous methods, it becomes possible to explore a variety of tonal colors. For example, when performing Mozart’s Clarinet Concerto, it is essential to maintain a light and fast airflow while keeping the embouchure relaxed rather than overly firm. Since tonal evenness is of utmost importance in this piece, overall control is necessary. Each performer can experiment with different embouchure adjustments and airflow techniques to express the unique character of Mozart’s music, ultimately developing their own distinctive sound. This approach serves as one possible method for shaping tone color, allowing for a more nuanced and multidimensional interpretation of the music.
FINAL THOUGHTS
Refining tone is a process that requires time and careful listening to identify the sound you wish to produce. As it is a complex and difficult aspect to define, developing a deep awareness of tone is essential. Although this process demands patience and dedication, it ultimately becomes a significant reward in musical performance. Just as the human voice resonates with listeners on a fundamental level, a well-refined tone can immediately captivate an audience and evoke an emotional response.
ENDNOTES
1 Joshua Gardner, “Ultrasonic Investigation of Clarinet Multiple Articulation” (DMA diss., Arizona State University, 2010); Steven M. Lulich, Sherman Charles, and Benjamin Lulich, “The Relation Between Tongue Shape and Pitch in Clarinet Playing Using Ultrasound Measurements,” Journal of the Acoustical Society of America 141, no. 3 (2017): 1759-68, https://doi.org/10.1121/1.4978059.
2. For more information about how clarinetists manipulate the acoustic parameters of their vocal tract during performance, see: C. Fritz and J. Wolfe, “How do clarinet players adjust the resonances of their vocal tracts for different playing effects?” J. Acoust. Soc. Am. 118 no. 5 (2005), 3306-15. doi: 10.1121/1.2041287. PMID: 16334701; J. Chen, J. Smith, and J. Wolfe, “Pitch bending and glissandi on the clarinet: Roles of the vocal tract and partial tone hole closure,” J. Acoust. Soc. Am. 126 no. 3 (2009): 1511–1520, https://doi.org/10.1121/1.3177269.
Comments are closed.