An Overview of Making Clarinet Reeds by Hand
By Katherine Breeden
For the clarinetist interested in total control over their sound, making reeds by hand is worth exploring. The learning process can also be advantageous for gaining a more thorough knowledge of commercial reed adjustment. This article provides an overview of the research found in my method Making Clarinet Reeds by Hand. It includes reasons to consider making reeds by hand, and step by step guides for the curing process and making a reed.
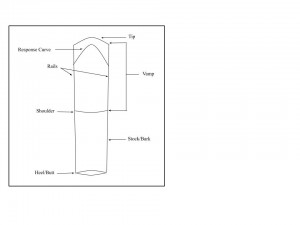
There are many advantages to making clarinet reeds by hand. First is the ability to tailor them to a specific mouthpiece by adjusting the vamp contour, widening or narrowing the heart as it tapers toward the tip, and positioning the response curve closer or further away from the tip. It is essential that the making of a quality reed be informed by the measurements of the mouthpiece.
Each person can find the best reed design for their preferences and replicate it indefinitely. Commercial reeds are cut by machines the same way with extreme precision. This method is not advantageous for all blanks since no two pieces of cane are exactly alike. They are cut from a living, growing plant and as such will respond differently even when formed into exactly the same shape. The handmade procedure requires play testing the reed throughout the process. This allows the player to make adjustments tailored to every reed to match their preferences as it takes shape, so each vibrates best for them and their setup.
By learning to make reeds, clarinetists can be more discerning in their choice of cane for blanks since they are choosing the cane themselves. Once a player is experienced in making their own reeds, they will have the techniques to duplicate their preferences with a higher success rate than commercial reeds, as long as quality cane can be found.
The curing and adjustment process to stabilize the cane and minimize warping is likely the greatest advantage of making reeds by hand. Warping is caused by the reed drying unevenly. As the reed dries unevenly, the wet side stays expanded while the side drying begins to contract, causing the general dimensions of the reed to change. Curing involves repeatedly soaking the blank with saliva and sanding the back of the reed. It serves to stabilize the reed and make the back almost completely flat.
Learning to make reeds requires a long term commitment to experimentation and discovery, but ultimately allows the performer more flexibility and consistency than commercial cane reeds.
Reed Diagram
Step by Step Curing Process
Materials Necessary
- Reed blanks
- Several sheets each of 120, 320, and 600-grit sandpaper
- X-acto knife handle and #25 X-acto blades
- Three files total: one extra narrow pillar file size “0” [zero], one round taper file size “0”, and one round needle file, size “0”
- Reed clipper
- Two pieces of plate glass: one approximately 12” by 12”, the other 1.5” by 5”
- A micrometer that measures in millimeters
- A bright desk lamp, preferably with a white LED light
Preparing the Blank
- Using 120 sandpaper, sand the reed blanks in a circular motion until they measure 3 mm thick in the middle of the blank. Use the micrometer to measure this. It may be helpful, if the initial cut down the vamp is not already done, to also measure the thickness of the blank closer to the tip and closer to the butt to ensure uniformity.
- Use 320 sandpaper to begin polishing the blank. Sand in a small oval for 50 repetitions.
- Use 600 sandpaper to finish polishing the blank. Sand in a small oval for 50 repetitions. (The blank will be about 2.85 mm thick at this point. There is no need to measure, this decrease in thickness happens with the sanding repetitions.)
Curing the Blank
4. Thoroughly wet the entire blank with saliva and place it flat side down on the 12” x 12” plate glass.
Wait 24 hours for the reed to dry completely and warp. Place a small pencil mark on the butt of the blank. Sand the reed again with 600 sandpaper in a small oval for 50 repetitions. Repeat this daily until the blank has five marks on the butt. At this point, the blank is ready to be made into a reed and should be very flat. After the fifth time, one must almost pry it off the glass.
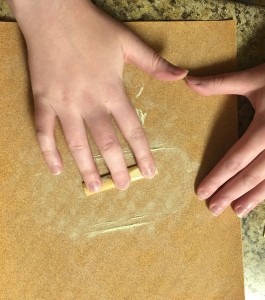
Sanding on 120 Grit Sandpaper
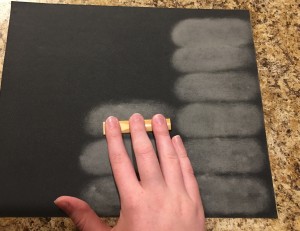
Sanding on 320 Grit Sandpaper
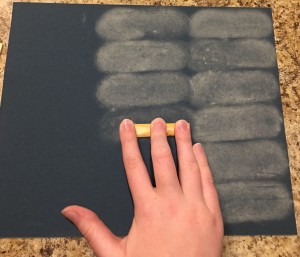
Sanding on 600 Grit Sandpaper
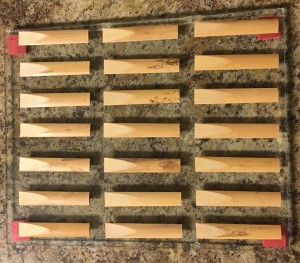
Blanks soaked in saliva on plate glass
Step by Step Instructions
1. Measure the length of the mouthpiece window in millimeters, then add two millimeters for when the reed is clipped. This will usually be about 34-36 millimeters. Measure this length from the tip of the blank and mark this spot with a pencil. A vamp that is too long will not hurt the reed, but a vamp that is too short will cause the reed to be virtually unplayable.
2. Using the X-acto knife and #25 blade, score the bark over the width of the blank at this point. Score deep enough to get the blade of the knife under the bark to remove it but no deeper. Then, carefully remove the bark from this line to the tip of the blank.
3. After the bark is removed, use the knife to create the general shape of the reed. It will be helpful to reference a finished reed throughout this process. Pay attention to the taper of both rails and the vamp from shoulder to tip, and the slight arc from rail to rail across the vamp. The top 3 mm or so should be cut as thinly and evenly as possible without breaking the tip.
Holding the Knife/Removing Bark Diagram
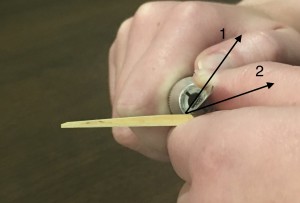 The knife starts at the first obtuse angle just to get under the bark. It then broadens to an even wider angle immediately after it has caught the edge of the scored bark so the cut is not too deep.
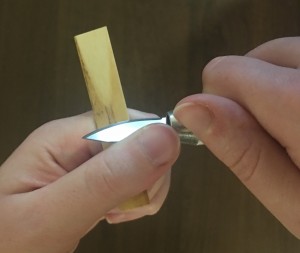 The dominant hand (in this case the right) pushes the knife while the other hand grips the blank between pointer finger and thumb. The thumb controls the angle and direction of the blade.
4. From this point, files and sandpaper should be dipped in a small glass of water before use to avoid damaging the cane and prevent the files from becoming clogged. Adjustments with files or sandpaper should be done against the small piece of plate glass to support the reed. Filing should be followed by sanding over the adjusted area with a piece of wet 600-grit sandpaper to avoid grooves that may be caused by the files.
5. Using the pillar file, begin filing long strokes from the back of the reed to the tip, angled slightly toward the center of the reed. This begins creating the heart of the reed. File both sides equally keeping the reed balanced, 50 repetitions for each side.
6. Using the tapered round file, continue the previous motion using long strokes from the shoulder across the reed, 50 repetitions again for each side is a good starting point. Continue using the tapered round file to begin to create the shape of the reed, removing more material from the center and back of the vamp. Experience is needed to find the shape that best serves one’s needs.
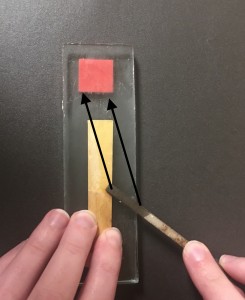
Narrow Pillar File (Step Five)
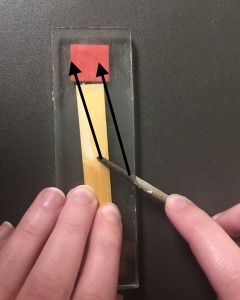
Tapered Round File (Step Six)
7. At this point, check the reed regularly using a white LED light.
8. As the shape begins to emerge using the round and pillar files, use the pillar file to create the tip. File against the grain, back and forth across the tip as evenly as possible. Use a very light touch to avoid breaking the tip. This is the only time the filing will work against the grain. Do not file to completion—leave a bit of extra thickness.
9. Use the needle file and small pieces of size 320 or 600 sandpaper to shape the heart/response curve as it tapers to the tip and to make small adjustments on the vamp. The shape of the heart as it tapers to the tip and its distance from the tip will vary based on what feels and responds well for the given setup.
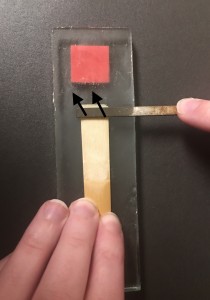
Narrow Pillar File (Step Eight)
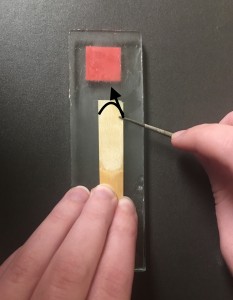
Round Needle File (Step Nine)
10. Try the reed at this point, holding it on the mouthpiece with the right hand. It will still have a square tip, but should give a good basic sound. If the upper altissimo works well leave the tip alone; if not, make sure it is thin enough by feeling the edge of the tip as it rests against the plate glass and comparing to a commercial reed. If the tip feels thick, stay away from the heart and thin it out with the needle file or sandpaper. Make sure the heart is blended into the tip by sanding lightly. If the reed is too hard, use the round taper file on the back and center of the vamp. If the reed is too soft or plays reasonably well, move on to the next step.
11. The reed will still be too wide for the ligature. Using the 320 sandpaper, dry-sand the sides of the reed, narrowing the reed to 13mm at the tip, and 11mm at the butt. Be sure to sand an equal amount on both sides so the balance of the reed is maintained. It may be necessary to lean on one end more than the other to get correct measurements.
Dry-Sanding the Sides of the Reed Diagram
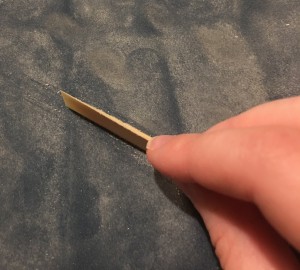
When dry-sanding the blank to get it to 11 mm at the butt and 13 mm at the tip, it is often necessary to lean more on one end than the other. As shown on the left, it is usually necessary to lean more on the butt, since it is thicker than the tip and requires more pressure to get the same results. Be very careful if it is necessary to lean more on the tip, as it sands down faster and is easy to tear the fibers.
12. Clip the tip of the reed. Take as little as possible off. If the tip does not clip off completely, carefully use the X-acto knife to finish it.
13. Continue to try the reed and make adjustments. It will likely not feel performance ready on day one. Be careful to set it aside if it becomes waterlogged.
14. Test and adjust the reed over the next few days. Do not spend too much time on any one reed. Always make sure the tip is well-adjusted first, then the middle and back of the vamp. Use the side-to-side test to check the response on both sides of the tip and run a finger along the vamp to feel for unevenness. If the upper altissimo does not work well trim the reed back less than 1 mm at a time until it is more stable, then remake the tip. If the reed is the right strength but not very responsive, thin out the vamp where the lower lip rests with the needle file. Continue to sand the vamp with a small piece of 600-grit sandpaper; it may also be helpful to burnish the reed with a finger to help seal the pores.
It could take a week before the reed plays at its best. Break it in by playing on it in shorter increments of 10 to 15 minutes the first few days, then increasing time as the reed settles in. The days spent adjusting double as part of the break-in process, so do not rush.
Reed-Making Process Diagram
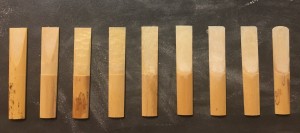
Steps Involving Knife
1. Commercial Reed Blank with Bark Scored
2. Bark Removed
3. Rough Vamp Contour Created
4. Tip Thinned as Much as Possible, Vamp Contour Refined
Steps Involving Files
5. Narrow Pillar File, 50 Repetitions per Side
6. Round File, 50 Repetitions per Side
7. Tip Thinned Using Narrow Pillar File Against the Grain
8. Tip Shaped with Needle File
9. Reed Clipped, Tested for Balance, Small Adjustments Continue Until Finished
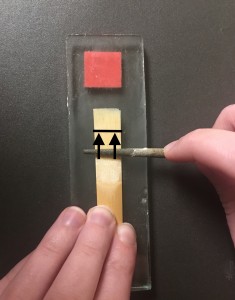
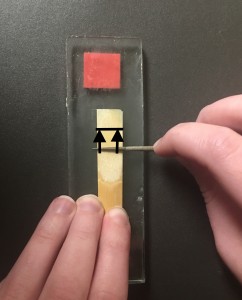
Additional Filing Motions
Bibliography
- Bowen, Glenn H. Making and Adjusting Clarinet Reeds. 2nd ed. Glenn Bowen, 2000.
- Breeden, Katherine. “Making Clarinet Reeds by Hand.” B.M. thesis, Arizona State University, 2018.
- Livengood, Lee. “A Study of Clarinet Reed Making, Part I.” The Clarinet 19, no. 3 (1992): 40-44. Accessed July 25, 2018. https://ica.wildapricot.org/page-18054.
- Opperman, Kalmen. Handbook for Making and Adjusting Single Reeds: For All Clarinets and Saxophones. 2nd ed. Oyster Bay, NY: M. Baron Co., Inc., 2002.
- Stubbins, William H. The Art of Clarinetistry: The Acoustical Mechanics of the Clarinet as a Basis for the Art of Music Performance. Ann Arbor: Guillaume Press, 1974.
About the Author
Katherine Breeden is the clarinet teaching assistant at the University of Kentucky and received her bachelor’s degree in music performance from Arizona State University. Her primary teachers include Dr. Scott Wright, Dr. Robert Spring, and Dr. Joshua Gardner. For more information on her research or thesis contact her at [email protected], or go to her website kbreedenclarinet.com.

Comments are closed.