
Originally published in The Clarinet 53/1 (December 2025).
Copies of The Clarinet are available for ICA members.
From the ICA Committees
by the ICA Pedagogy Committee
TONE AND TECHNIQUE, PART II
INTRODUCTION
Technique is often equated with speed, but as clarinetists and teachers we know it involves much more. The following collection brings together insights from several performers and educators, each offering strategies that address tone, coordination, articulation, equipment, extended techniques, and even the mental approach to practice. While their perspectives differ, a common thread emerges: technical fluency grows from mindful, consistent work that prioritizes clarity, coordination, and musicality.
TONE AND TECHNIQUE
by George Stoffan
Students have often asked me about how they may improve their technique. In most cases, their initial focus is on building speed. It is how many students define technique.
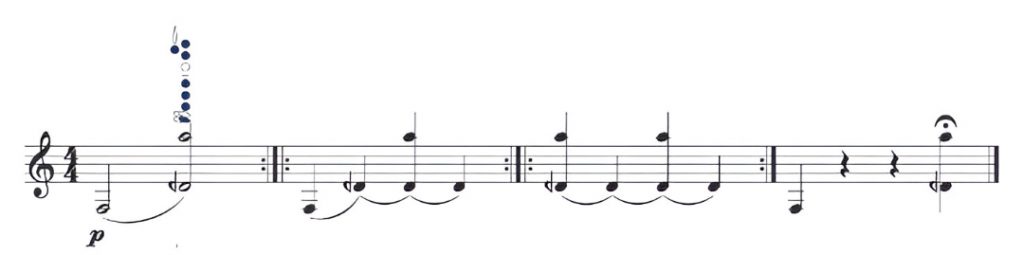
I have learned to redirect this definition of technique towards concepts of coordination and clarity. With good coordination, there is clarity in the technique. Speed comes over time. In order to achieve good coordination, one must focus on such basic ideas as where and how the fingers land on the tone holes, the release of the fingers from the keys, the shape of the fingers and distance and position over the keys, and the general lack of tension required for fluid motion. This is, in essence, the “technique of technique,” and is where my focus is in my work with students who are seeking to improve their technique. There are some even more fundamental concepts that are essential to developing sound technique. I encourage all of my students to practice a variety of tonal exercises. When they do so, they simplify clarinet playing to its most basic elements. During this time, they focus their mind on the breath and preparation of the air, and the setting of the embouchure and tongue. This simple approach enables one to also listen carefully in evaluating the tone, and ensuring that each tone matches in dynamic, timbre and pitch through the scale, and connects for an even legato.
The fundamental tone building exercises aid in one’s overall development as a clarinetist. Our ability as clarinetists to execute long, legato phrases and large intervals with ease is the natural benefit of focusing on tonal exercises. However, our work on fundamental tonal exercises also serves our technique. When we have a solid foundation in tone production, we achieve better response from the instrument. The movement and motion of the fingers comes more readily when the instrument is responding with more ease. When this “technique of the technique” is better enabled because of the response of our instrument, and as a result of strong tonal fundamentals, our coordination is improved. With improved coordination, and with consistency over time, the speed—and most importantly, the clarity—will come.
The slow practice of passagework is essential. It is important that slow practice is not done for the sake of slow practice, but that it is done in a considered and thoughtful way, with these concepts in mind. Practicing slowly allows us to utilize the skills we develop in our tonal development exercises and the attention in how our fingers move on and off the keys in technical exercises in the context of a passage we are learning. We should be listening, adapting, and adjusting according to these principles. Beyond incorporating these fundamental concepts into developing our technique, we always need to be mindful of the phrase, to find lyricism in the passagework, so that it is never static, stale, or mechanical in its execution. The forward direction of the air column, developed through our tonal work, has the effect of generating greater response from the instrument and better enabling our technique, but also allows for a more singing phrase and musical line.
We should aim to combine such fundamental work with some basic exercises within a passage. These include beat-to-beat work, altering rhythms, and playing passagework backwards. Beat-to-beat practice involves playing a single beat of notes to the first note of the following beat, doing so several times, and then doing the same for the following beat. These two beats are then played together, and the process continues, adding one beat at a time. One doesn’t need to always land on the first note of a beat. Stopping on different notes within a beat creates a variation of this exercise, and generates a variety of groupings. I often alter rhythms. For instance, in a 16th note passage, where there are groups of four notes per beat, I will organize the passagework in groups of three. Conversely, in triplet passages, I will organize the passagework in groups of four. A related approach is to break down a passage into various series of short and long notes. In a 16th note passage, one can play, for example, the four notes of a beat in a series of the following combinations: short-short-long-long, long-long-short-short, and long-short-short-long. One could also experiment with the many other rhythmic possibilities with reorganizing four notes within the beat, in this example. Finally, I will literally play the passage backwards, starting with the last note of a phrase or group of notes, and add a note, playing backwards one note at a time and back to the end, in continuous loops. These strategies have worked for me, and for my students. There are many effective methods for learning passagework beyond those I suggest here. We should aim to create and invent new strategies, as each passage has its own unique challenges.
I believe building technique comes in two parts: tonal development, and basic exercises within specific passagework. The tonal development comes in the form of tonal exercises, with the aim of building a solid foundation that will enable good coordination of the fingers, the “technique of the technique.” This is all reinforced with slow practice. The basic exercises within specific passagework aids in learning the passage, and in building the speed required to perform it. As clarinetists and musicians, we need both the tonal and slow practice, and the basic exercises with specific passagework to be successful. It takes time to develop coordinated technique and to learn certain passages in the repertoire, but with patience and consistency in approach, we can develop stable and settled technique and enjoy our music making in the process.
PRACTICING FOR GOOD TECHNIQUE
by Julianne Doyle
Acquiring efficient technique requires solid fundamentals and organized practice strategies. The hands must be set up properly with relaxed curved fingers, and minimal finger motion and pressure will allow for good smooth technique.
To “practice” technique, begin slowly, as if playing a slow scale, utilizing practice rhythms in slow tempos:
- Begin in half notes and shape the line to phrase goals
- Next move to quarter notes, eighth notes, triplets, 16th notes, etc.
- Utilize fermatas holding on different parts of the beat with triplets or 16th notes
- Employ swing rhythms of long-short or short-long
- Work from the back of a passage and adding a note moving towards the beginning, in time but start under tempo
TARGET PRACTICE
Use the metronome and focus on short passages within a larger technical section, while practicing slowly. Gradually increase the tempo while maintaining relaxation. If the fingers begin to feel tense or you feel unsure of what is coming next, slow the tempo, reinforce where the passages feel comfortable, and stop at that speed for the day. In the next practice session, begin a couple of clicks slower, and aim to increase the tempo beyond your tempos of the previous session. Avoid practicing through tension as it will cause sluggish technique and inconsistent technical control.
Be conscious that your practice does not become mindless repetition. Technical practice must be intentional and musical. Ask yourself:
- What key are you outlining in the passage?
- Are there modulations?
- What does this passage say musically?
- Are there augmentations or diminutions of melodic lines?
- How does this passage connect to the rest of the piece?
- When do I lose the shape and control, is that too fast?
Target small sections, shape the musical line, discover phrase goals—these are focal points to aid technical control. Often referred to as anchor points or goal points, use these notes to anchor the technique and shape the phrases.
Stay patient and consistent through your technical practice. If progress is rushed, technique will feel harried and tense. Consistent slow practice with relaxed fingers, mindful repetition, and phrase goals will allow for ease and technical mastery.
EQUIPMENT AND SETUP FOR TECHNICAL EASE
Equipment should always enhance what a player does, not impede progress. If the combination of reed/mouthpiece/ligature is not working efficiently, players will spend a large percentage of their energy generating the sound, leaving less energy to focus on mastering tone, technique, and musicianship. Strive for equipment that takes 5% of energy to create the sound. It shouldn’t be too easy—you need some resistance—but make sure it isn’t so much that it creates physical tension just to produce the sound. This leaves 95% of the mental and physical energy to focus on everything else. Many young players are more of a 40% production and 60% for everything else. The effort of generating the sound, if impeded by equipment, can distract and hinder progress.
Mouthpiece
Regularly clean and inspect your mouthpiece for damage and either replace the mouthpiece or see a craftsman to repair the damage. Most commercial mouthpieces wear down after four to five years and need replacing or refacing.
Reeds
Rotate reeds so there is always a healthy supply of old, current, and new reeds. Even synthetic reeds have a shelf life and need to be replaced. Make sure the reed allows for ease of response, good articulation, and generates the desired tone quality.
Instrument Leaks
Instrument leaks can feel like the keys need to be pressed harder, no reed works, and the instrument has extra resistance. If it feels like the fingers won’t seal the holes without extra pressure, have a technician examine the instrument for leaks.
Bridge Key
Bridge key alignment is crucial, and if not properly set up, can cause a host of problems. Sometimes visually the keys look aligned, but because of natural wear, you might need to offset the key just slightly. Good tests include:
- Check the “one and one” B-flat above the staff; if it doesn’t respond, likely your keys need adjusting. Shimmy the joints a little and try again. If it works, that is where you need to align the bridge until you see your repair technician.
- Finger the “one and one” B-flat and tap the pad below the upper joint index finger. Does it move? If so, the pad is leaking! This will create unnecessary resistance and impede ease of sound production.
Pinky Keys
Sometimes the pinky keys take extra force to close; they shouldn’t! A technician can assist in making sure all pads are sealing properly and the spring tension is adjusted accordingly.
Throat A Key
Be sure the throat A key has just a little wobble when lightly touched. Avoid adjusting the screw to the point the key is down too far with no wobble; this will create an added leak at the very top of the instrument.
Joint Leaks
The instrument joints should fit together firmly but not so tight that you cannot disassemble the instrument. If the tenon corks are compressed and loose, have a technician expand the corks or change them. In a pinch, use plumbers’ tape or dental floss to wrap the tenon for a good seal at the joint. This will allow ease of sound production because the instrument is not leaking at the tenon.
Hands: Mind the Thumbs!
To aid the ease of the hand position, the thumbs must be in the proper positions.
Left Hand Thumb
The left hand thumb needs to hover behind the hole when not in use, avoid dropping it down and resting it on the wood below, this causes sluggish register changes because the thumb will be delayed getting back up to cover the hole.
Right Hand Thumb
Right hand thumb placement is crucial to both hand position and the embouchure. Most thumb rests are positioned too low. Be sure the thumb is in a natural position for the hand. The right hand thumb also gently pushes the clarinet up into the upper teeth to create balance while holding the instrument.
Test: Pick up a water bottle and observe the natural proximity of your thumb to your index and middle fingers. This is where your thumb should be when holding the clarinet. Adjust the thumb rest accordingly. If your thumb rest is not adjustable, you can ask a technician to move your thumb rest up or replace the thumb rest with an adjustable that is in the right position for the hand. Utilize a neckstrap (recommend elastic/stretchy) that will help support the instrument, and a thumb cushion if you feel necessary.
See your technician regularly—minimally one visit a year for a COA (care, oil, and adjustment)—to ensure the instrument is always in working order. Keeping the instrument in excellent condition and using a good mouthpiece/reed set-up will allow ease of sound production and pave the way for beautiful tone and efficient technique.
ARTICULATION AND FINGER COORDINATION
by Gail Zugger
Technique is directly impacted by articulation and vice versa. When articulation is applied to the technique well, stylistic and expressive elements are well at hand. When articulation is less effective, the ability to communicate musical phrasing, direction, and ideas with consistency becomes challenging. Consider how challenging it would be to communicate something meaningful to someone using only vowels and no consonants?
One challenge clarinetists often face is aligning the fingers and the tongue. It is important to work on this as a fundamental exercise and to have strategies ready to employ when practicing individual spots. There are many ways to work on this in your practice. For instance, here are some exercises to employ finger/tongue coordination work in your daily warm-ups. Using a variety of tempi and scales will be useful and effective. Exercises A, C, and D can be played with any major or minor (all three types) scale in any octave. Exercise B can begin on any pitch.
There are many exercises to help work towards clear articulation. One to recommend is Bonade’s “fingers forwards” exercise. It is tricky to describe in prose here, but there are many fine YouTube videos that demonstrate the concept. Using a staccato, short articulation, begin to finger the next note as soon as the previous note stops sounding, essentially during the silence between the notes. This technique can require a dramatic slow-down in tempo (almost as if in slow-motion), especially at first.
To apply fundamentals to specific tricky finger/tongue coordination passages, separate the two first to ensure each is working properly on their own. In other words, play the articulation required on one note, perhaps the starting note of the passage, listening for consistency of articulation length and quality. Play the passage all slurred ensuring the fingers are working evenly, and that the sound is even through any register changes. Consider adding expressive and interpretive elements in the music as well—such as dynamics, length, or tempo alterations—while separating the two.
Lastly, when putting it all together again, and throughout any work on finger/tongue coordination, always be mindful of air use and air support. Many articulation concerns are fundamentally air issues.
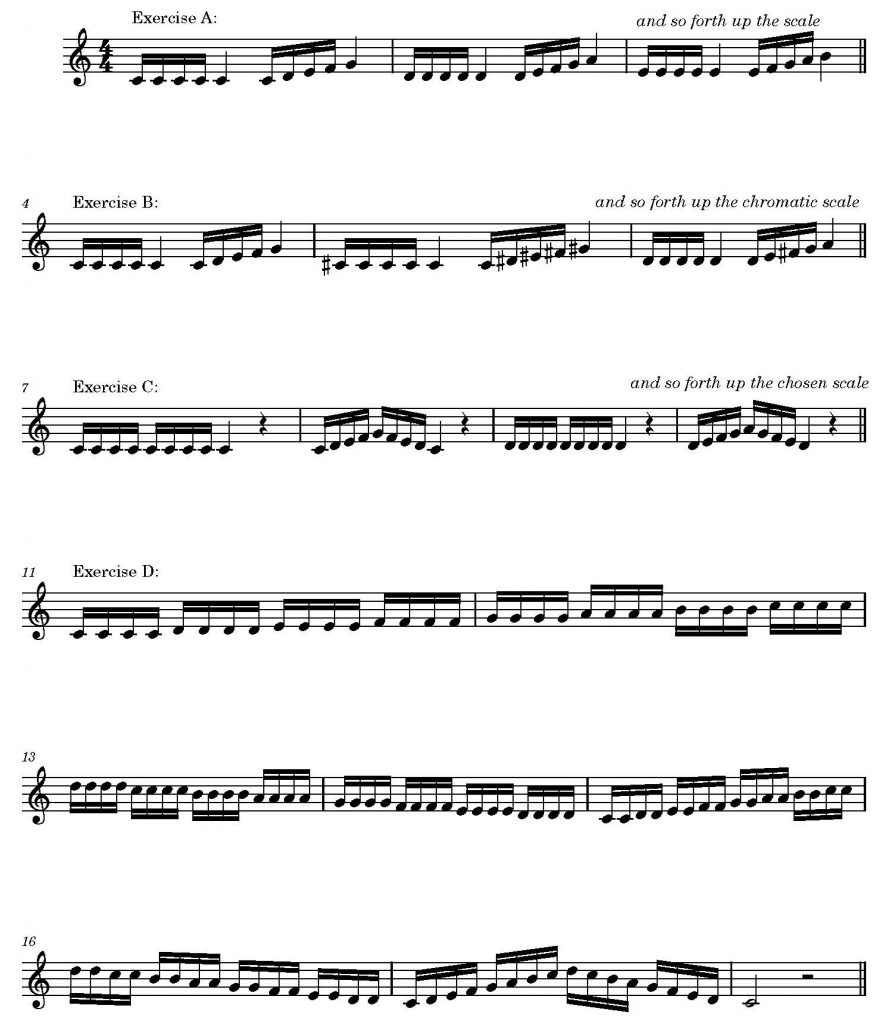
Exercises A, B, C, and D
ÉTUDES AND REPERTOIRE FOR TECHNIQUE DEVELOPMENT
There are many études available to be used to challenge clarinetists and assist with technical development. They vary in difficulty level from beginner to advanced. Likewise, some are tried and true, having been used for clarinet instruction for two centuries, while some are newer. Here are a few to recommend:
SCALE BOOKS
Beginner/Intermediate
- Albert, J. B., 24 Varied Scales and Exercises
- Denny-Chambers, Finger Fitness Foundations
- Denny-Chambers, Finger Fitness Scale Connections
- Denny-Chambers, Prep Steps before You Kroepsch
- Klose, Studies
- Parès, Daily Scales & Exercises for Clarinet
- Stievenard, Practical Study of the Scales For the Clarinet
Advanced
- Baermann, Foundation Studies, op. 63 (many editions)
- Jettel, Klarinetten-Schule
- Kroepsch, 416 studies
ÉTUDE BOOKS
Beginner/Intermediate
- Denny-Chambers, Finger Fitness Études, Books 1 & 2 (includes étude versions that include low C extension notes for bass clarinetists)
- Hite, ed., Melodious and Progressive Studies, Book 1
- Lester, The Advancing Clarinetist
- Lester, The Developing Clarinetist
- Lester, The Progressing Clarinetist
- Rae, 18 Concert Études
- Rae, 40 Modern Études
- Rose, 32 Études
- Voxman, ed., Selected Studies
Advanced
- Anderson, 32 New Études for Clarinet
- Cavallini, 30 Caprices
- Denny-Chambers, Finger Fitness Études, Book 3 (includes étude versions that include low C-extension notes for bass clarinetists)
- Hite, ed., Melodious and Progressive Studies, Book 2
- Jeanjean, 18 Études
- Jeanjean, Vade Mecum
- Polatschek, 12 Études
- Polatschek, Advanced Studies
- Rae, 12 Modern Études
- Rose, 40 Études
- Rose, 20 Grand Études after Rodé
- Uhl, 48 Studies
Here are some étude books with specific technical goals in mind:
- Filas, Altissimo Studies for Clarinet (boosts response and fingerings in the highest register)
- Kell, 17 Staccato Studies (articulation/technique alignment)
- Opperman, Modern Daily Studies (each study devoted to particular technical issues: left hand, right hand, register key, etc.)
- Stark, Daily Staccato Exercises (articulation/technique alignment)
With a wide variety of challenge levels, musical genres to choose from, and motivating material, just the right étude book is readily available to support our continued pursuit to improve our technical development for ourselves and our students alike.
LEARNING & PRACTICING EXTENDED TECHNIQUES
by Caitlin Beare
Extended techniques are methods of playing that extend beyond the standard physical requirements of instrumental performance. Over the past several decades, the clarinet repertoire involving such techniques has grown immensely, making extended techniques an essential component of contemporary clarinet study. Integrating extended techniques into your practice not only expands your expressive possibilities but also reinforces fundamental skills like voicing, tongue control, finger dexterity, and air support. Moreover, introducing extended techniques in earlier stages of musical development helps to normalize nontraditional approaches to performance and prepare clarinetists for more advanced studies.
This section focuses on three extended techniques—slap tonguing, microtones, and multiphonics—that are widely used as musical material rather than as mere effects. While only a small subset of possible extended techniques, these are prevalent in the contemporary clarinet literature and accessible to performers of varying levels. For resources on these and other extended techniques, review my compendium of pedagogical materials for extended techniques.
SLAP TONGUING
Slap tonguing is a percussive effect created by forming a suction between the reed and mouthpiece, then releasing the suction, causing the reed to “slap” back against the mouthpiece. Anchor tonguing—articulating with the middle of the tongue while leaving the tip “anchored” behind the bottom front teeth—is a useful method of working towards slap tonguing, and clarinetists who can anchor tongue may find slap tonguing easier to learn.
Tips:
- Practice on an old reed.
- Practice on a bass clarinet.
- Contain your practice to the lowest register—I suggest practicing slap tongue on a low E.
Begin by developing “lingual awareness”:
- Locate the tip and middle of your tongue by lightly scratching each area with your finger.
- Place the tip of the tongue on the reed, then allow the middle to make contact, noting the larger surface area.
Then, create suction with the tongue and release it quickly to generate the slap. Do this until the slap is consistent, then try slowly slap tonguing a few scales. Remember that the tongue is a series of muscles, so make sure to rest when you feel fatigued. Slap tonguing is a great way to improve control over tongue placement and motion, which can lead to more clarity and precision in standard articulation.
MICROTONES
A microtone is any interval smaller than a half step. Since the modern clarinet was not designed to deftly play microtones, clarinetists must either manipulate the embouchure or, in most cases, learn unconventional, often unwieldy fingerings. Learning microtones can be cognitively demanding, akin to learning a new instrument, but the process refines ear training and finger dexterity, and, in the right context, can be accessible to even beginner and intermediate clarinetists.
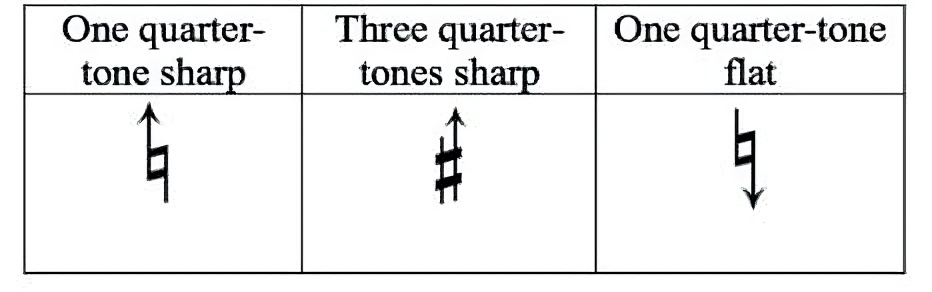
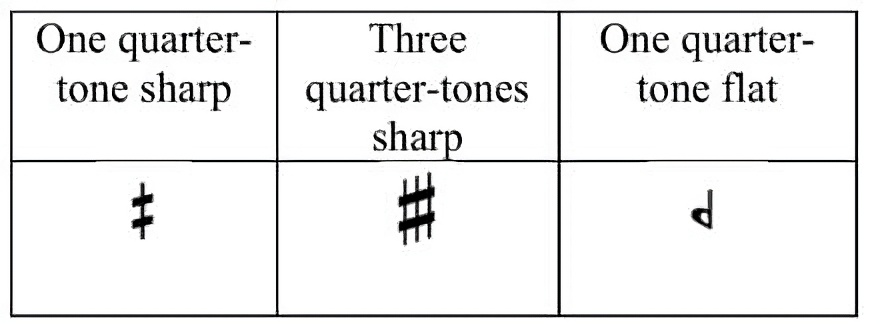
While notation practices for microtones vary by composer, two systems are especially common: one system uses arrows and one uses Tartini sharps. The former system is composed of arrows attached to accidentals, indicating the direction of the pitch modification. In this system, the arrow always modifies the pitch by a quarter-tone.
Example 1: Microtonal notation system with arrows.
Example 2: Microtonal notation system with Tartini sharps.
The other notation system comprises signs for one quarter-tone and three quarter-tones sharps that were first used by Giuseppe Tartini in 1756; it also includes a backwards flat sign for one quarter-tone flats.

Exercise 1

Exercise 2
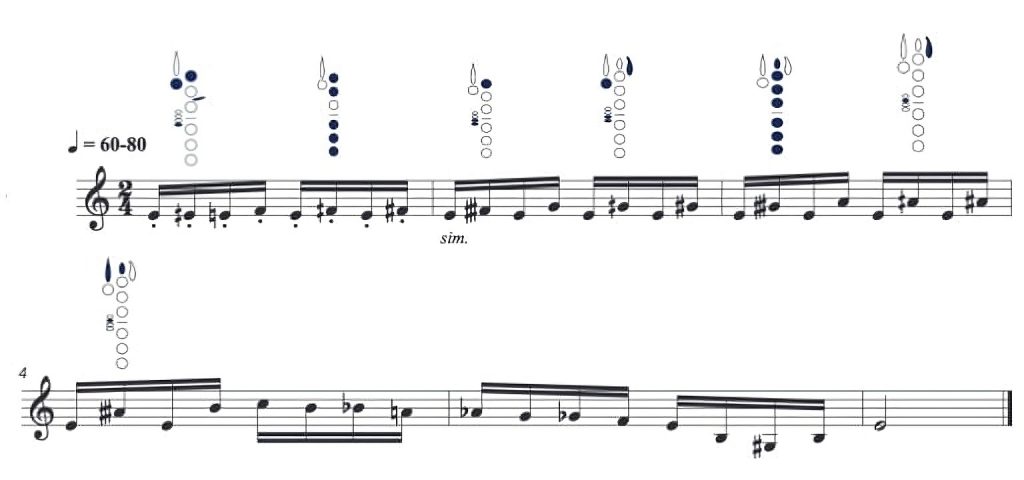
Exercise 3
Above are three basic exercises that introduce microtones, progressing in difficulty. All three use the microtonal notation system with Tartini sharps. I recommend isolating each microtonal fingering before playing through each exercise. Once you have command of the fingerings, play the exercise slowly, listening for timbral and/or dynamic qualities related to the given microtones.
MULTIPHONICS
Multiphonics involve producing two or more pitches simultaneously, typically by using an unconventional fingering or changing the voicing on a conventional fingering.1 While multiphonics are often used for their complex, colorful sonorities, practicing them also deepens a clarinetist’s understanding of the tongue’s role across registers. Approaching multiphonics as a study in voicing provides an opportunity to develop tongue control, as multiphonic production is essentially an extension of familiar voicing strategies.

Exercise 1
Exercise 2
The exercise above involves changing the voicing on a conventional fingering. This features “underblown” multiphonics, where you allow the lower pitch, or undertone, to speak. This undertone is the “grunt” that beginner clarinetists often produce unintentionally when attempting to play in the upper clarion register. Underblown multiphonics are usually played at soft dynamics. Try playing the desired pitches individually before attempting the multiphonic. Then, finger the upper pitch and relax the embouchure slightly to allow the lower pitch to emerge.
The next exercise uses an unconventional fingering for the multiphonic. Voice the upper pitch, then allow the lower pitch to fade in. Notice how voicing changes affect the balance of the multiphonic.
Just as practicing scales, arpeggios, and long tones improves our ability to perform difficult repertoire, establishing a foundation in extended techniques is vital to both interpreting and physically performing contemporary repertoire. Moreover, exploring extended techniques helps cultivate flexibility, creativity, and a deeper understanding of the instrument, which directly enhances all aspects of clarinet playing. Incorporating extended techniques into regular practice not only equips clarinetists for contemporary repertoire but also fosters a more well-rounded contemporary clarinetist.
MENTAL APPROACH TO TECHNICAL PRACTICE
by Jennifer Branch
STARTING: DON’T ALWAYS CHOOSE THE BEGINNING
Have you ever noticed that starting a piece brings a freshness, a newness, a world of possibility? What if the opposite were true: what if we grew in confidence as we progressed?
This brings about a new possibility: start your practice sessions from different sections, or choose backward practice. If we start with the last measure, then play the last two measures, etc., we more likely will grow in confidence as we encounter that which is familiar, rather than diminish our confidence as the section becomes less familiar.
THAT TRICKY SECTION: ALTERED RHYTHMS2
Let’s replay a familiar situation: we’ve started our practice session and (like usual) the beginning of the piece goes well. It’s only after we’ve encountered that section that is “always” difficult that any mental negativity sets in. The challenging section won’t be less so unless we hone in on ironing out the rough spots. As an example, if the challenging section is one bar of 16th notes, assign a variety of new rhythms throughout:
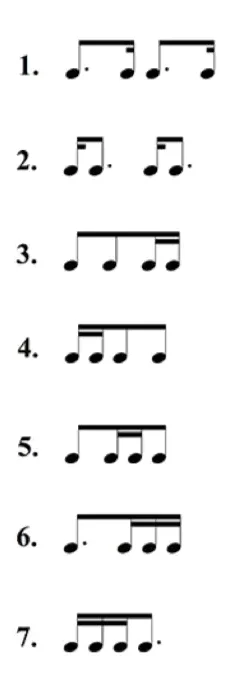 By “rewriting” the challenging section, we mentally disassociate that bar as a challenge. We instead view it as creative and more playful.
Once you’ve finished bringing altered rhythms to your challenging section, be sure to insert your productive practice back into the piece by entering and exiting the challenging bar as well.
EYES ON ALL REPEATED SECTIONS
If your piece has a return of a familiar section, be sure to put your eyes equally on the returning repeated section as much as the original. Definitely don’t assume that because you’ve practiced looking at it on the left page, you don’t have to view its return on the right page.
MENTAL PRACTICE “AWAY”
As suggested in the book The Inner Game of Tennis by W. Timothy Gallwey, once you’ve done the hard work, it is through the uncluttered mind—a mind free of obstacles—when we allow our best performance to come through. Whether it’s for an audition or simply for your practice sessions, that challenging section may always bring association of nervousness or anxiety. Before you start, take a brief moment before you begin to give a look through that challenging section: slow it down in your head, hear it slowly, and imagine the feel of playing it. This slower mental approach may bring good results during your once-through attempt.
CONCLUSION
While the contributors here emphasize different aspects of clarinet technique—tone, coordination, articulation, equipment, études, extended techniques, or mental focus—they converge on one truth: technical mastery is about clarity, efficiency, and expression. Technique is not an end in itself but a pathway to artistry. By cultivating fundamentals and approaching practice with creativity and patience, clarinetists can achieve not just speed, but freedom in their playing.
ENDNOTES
1 Multiphonics can also be produced by humming or singing while playing. For further information on these methods, see: Jeremy Ruth, Humming and Singing while Playing in Clarinet Performance: An Evidence Based Method for Performers and Resources for Composers (DMA Diss., Arizona State University, 2019), ProQuest Dissertations & Theses Global.
2 Graham Fitch, “On Dotted Rhythms,” Practising the Piano April 25, 2011, https://practisingthepiano.com/on-dotted-rhythms/.
Comments are closed.